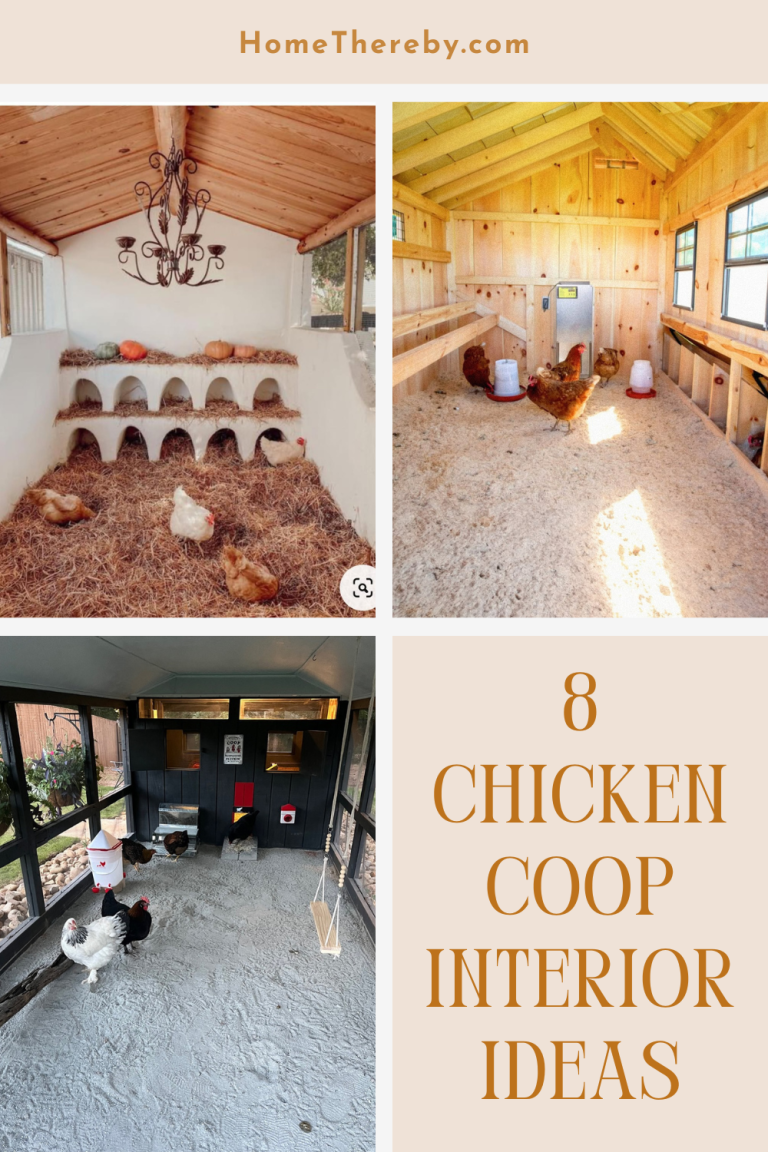
10 Chicken Coop Decorating Ideas to Add Charm and Personality
Who says your backyard flock has to live in a plain old shed? With a little creativity, ordinary chicken coops can transform into a charming, personality-packed space that feels just as welcoming as your own home.
From rustic farmhouse touches to colorful, Pinterest-worthy designs, these 10 chicken coop decorating ideas will have both your hens and your guests clucking with delight.
Chicken Coop Decorating Ideas
1. Beautiful Farmhouse Coop

Image: https://www.instagram.com/chick_inn_coops/
What Makes It Unique
This design stands out for its thoughtful details and high-quality construction. The combination of classic white siding and natural wood doors creates a striking contrast. Features like the corrugated metal roof, window awnings, and a built-in flower box add a touch of personality and charm, turning a simple coop into a stylish backyard feature. The spacious enclosed run also gives your chickens plenty of room to roam safely.
Materials Needed
- Exterior-grade plywood
- 2×4 lumber
- Wood siding or shiplap boards
- Corrugated metal roofing
- Wood for doors and trim
- Chicken wire
- Window frames and glass
- Door hinges and latches
- Exterior paint and wood stain
- Nesting boxes
- Roosting bars
How To Do It
- Framing the Structure: Begin by building a sturdy frame for the coop and run using 2×4 lumber. Ensure the dimensions are large enough to accommodate your flock comfortably. For a farmhouse look, consider a sloped roof design.
- Adding the Siding: Cover the coop’s exterior with your chosen siding, such as white shiplap or wood siding, for that classic farmhouse appeal.
- Constructing the Doors and Windows: Build the coop doors using wood to create a rustic, barn-door style with an X-brace design. Install sliding windows for ventilation and natural light. Consider adding simple wooden awnings above the windows for extra visual appeal.
- Creating the Run: Frame the enclosed run and attach chicken wire securely on all sides and the top to protect your flock from predators. The run should be attached directly to the main coop for easy access.
- Installing the Roof: Secure the corrugated metal roofing sheets to the top of the coop and run frame. This material is not only durable but also enhances the farmhouse aesthetic.
- Finishing Touches: Paint the coop exterior a clean, classic white and stain the wooden doors, awnings, and trim a warm, natural color. Add a flower box below a window and a small exterior light to complete the look. Inside, install roosting bars and nesting boxes for your chickens.
2. Craft a Colorful and Eclectic Coop

Image: https://www.reddit.com/user/Responsible-Cod812/
What Makes It Unique
This coop has bold use of color and texture. The exterior, made from various painted wood planks, creates a patchwork effect that is both rustic and artistic. Inside, natural branches are repurposed as roosting bars, and custom-built nesting boxes offer a charming, functional space. The overall design exudes a joyful, handcrafted feel that reflects personality and creativity.
Materials Needed
- Reclaimed wood planks or pallet wood
- Exterior paint in various bright colors
- Clear protective sealant
- Tree branches for roosting bars
- Plywood for nesting boxes and interior framing
- Windows (new or reclaimed)
- Corrugated metal (for trim or accents)
- Chicken wire (for run, if applicable)
- Wood screws and nails
- Paintbrushes
- Sandpaper
How To Do It
- Gather Reclaimed Materials: Start by collecting various wood planks, such as pallet wood or old fencing. The beauty of this style is in the imperfections and varied textures.
- Paint the Planks: Paint each plank a different bright color, or use a mix of colors and natural wood tones. Don’t worry about perfection; a distressed, rustic look is part of the charm.
- Construct the Coop Exterior: Attach the painted planks horizontally to the coop’s frame, creating a colorful, striped facade. Mix and match colors freely.
- Build Interior Fixtures: Inside, construct multi-level nesting boxes using plywood. For roosting bars, use sturdy, naturally branched tree limbs, securing them firmly to the coop walls.
- Install Windows and Doors: Integrate windows (reclaimed or new) into the design to allow natural light. Fashion a unique coop door, perhaps using corrugated metal or more reclaimed wood.
- Add Whimsical Details: Personalize your coop with decorative touches like a painted rooster silhouette, a “Farmhouse” arrow sign, or a custom nameplate for your coop. These small details enhance the eclectic feel.
- Protect and Seal: Once painted and assembled, apply a clear exterior sealant to protect the wood and paint from the elements, ensuring your colorful coop lasts for years.
3. Cozy Cottage Coop
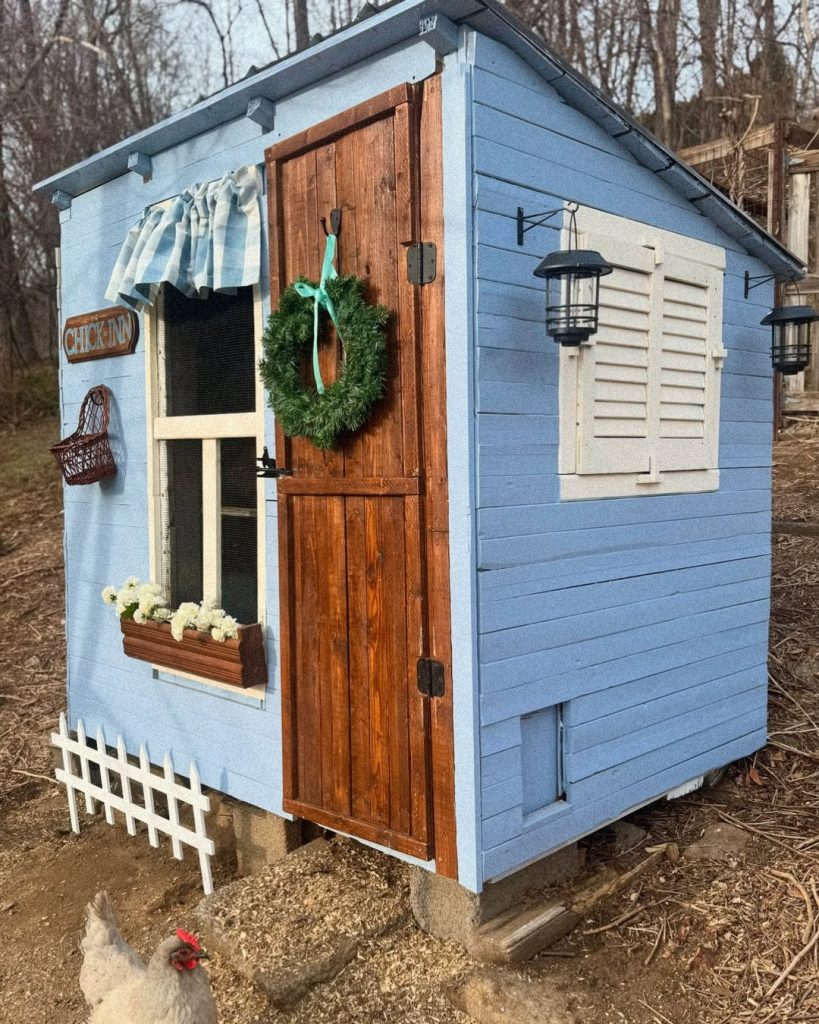
Image: https://www.instagram.com/fireflyforestnj/
What Makes It Unique
This decoration elevates a simple coop into a picturesque garden feature. The pale blue paint paired with the stained wood door and white trim creates a classic, inviting color scheme. Small, decorative elements like the miniature picket fence, window shutters, and a flower box add personality and a finished look. Even the smallest details, like the hanging wreath and the “Chick Inn” sign, make this coop feel like a cozy, lived-in home.
Materials Needed
- Exterior-grade wood or siding
- Light-colored exterior paint (like pale blue or mint green)
- Wood stain
- White exterior trim paint
- Functional or decorative window shutters
- A small window box
- A miniature picket fence section
- Outdoor light fixtures
- A wreath or other hanging decoration
How To Do It
- Paint the Coop: After building your coop structure, apply a few coats of a light, welcoming color like pale blue or a soft green to the exterior siding.
- Stain the Door: Treat the main door with a rich wood stain to create a beautiful contrast against the light-colored walls.
- Add Trim and Shutters: Paint all trim, including around windows and the door, with a crisp white color. Attach decorative shutters to one or more of the windows.
- Install Accessories: Mount a small window box below a window and fill it with artificial flowers for year-round beauty or real ones for a fresh look. Attach miniature fence panels to the base of the coop for a playful touch.
- Decorate: Hang a small wreath on the door and a charming sign to give the coop a name, like “Chick Inn.” Install a couple of outdoor lanterns on either side of the door to complete the cottage feel.
4. Maximize Interior Space with Clever Decor

Image: https://www.reddit.com/user/SaSKingD/
What Makes It Unique
It demonstrates how you can optimize the inside of a coop for both utility and aesthetics. By mounting roosting bars at different heights, you provide a natural and comfortable sleeping arrangement for your chickens. The wall-mounted feeders and waterers keep the floor clean and the food sanitary. Adding rustic, farmhouse-style decor to the walls turns a simple, functional coop into a cozy and inviting home.
Materials Needed
- Unfinished wood planks or 2x4s
- Wood screws
- Metal buckets with handles
- Heavy-duty hanging hooks
- Rustic kitchen gadgets (old graters, metal tins, etc.)
- A small art print with a wooden frame
How to Do It
- Build a Multi-level Roosting System: Use sturdy wood planks to create a tiered roosting area. Attach them securely to the coop walls at varying heights to give your chickens a natural place to perch and sleep.
- Install Wall-mounted Feeders and Waterers: Attach hooks to the coop walls and use them to hang metal buckets for food and water. This keeps the feed off the floor, preventing waste and contamination.
- Decorate the Walls: Use the blank wall space as a canvas for simple, rustic decor. Hang vintage kitchen tools, such as old graters, metal tins, or a small thermometer. This adds a charming, farmhouse feel.
- Add a Framed Art Piece: Mount a small, framed picture on the wall to give the coop a personal touch. A simple landscape or animal print is perfect for adding to the cozy, cottage-like atmosphere.
5. Decorate for the Holidays
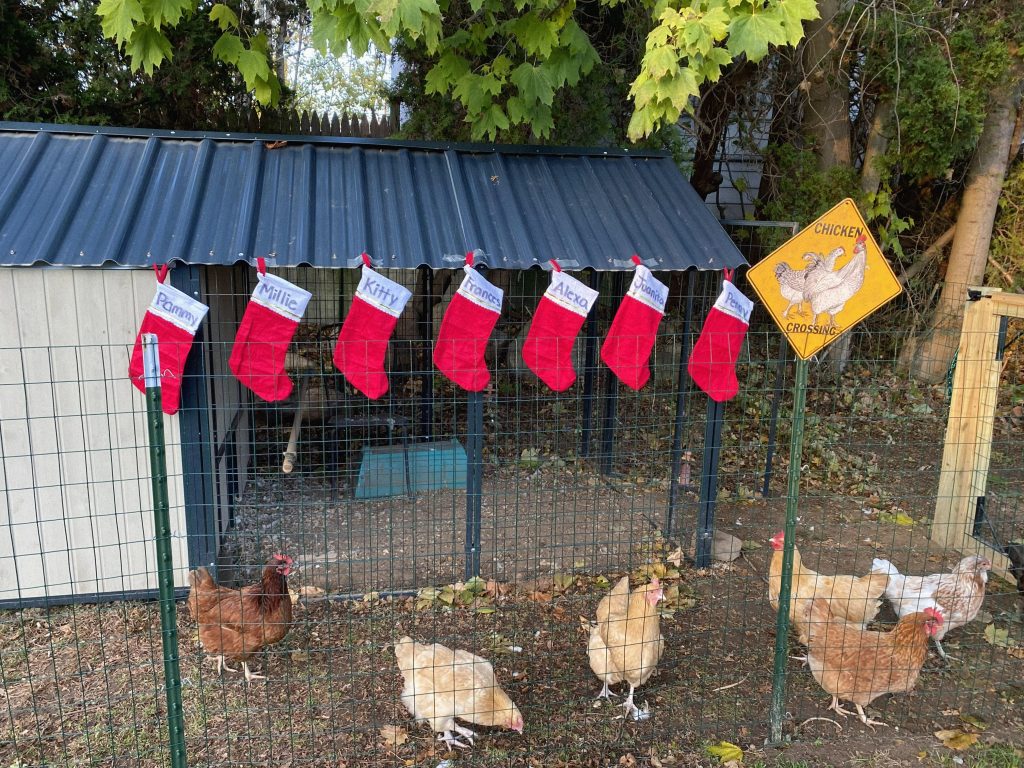
Image: https://www.reddit.com/user/Novel_Giraffe4906/
What Makes It Unique
It’s a fun and festive way to celebrate the holidays with your chickens. This seasonal decor is easy to set up and remove, so it doesn’t require any permanent changes to the coop. It’s a great opportunity to create memorable photos and share your love for your flock in a unique and heartwarming way.
Materials Needed
- Outdoor-safe string lights
- Garland (real or artificial)
- Small ornaments or festive cutouts
- Miniature stockings or a festive banner
- Zip ties or outdoor-safe hooks for hanging
How to Do It
- Hang Festive Stockings: Attach small, personalized stockings with your chickens’ names to the exterior of the coop or along the fence of their run. This is a simple and charming way to get your flock in the holiday mood.
- Add Lighting and Garland: String outdoor-safe lights along the roofline or fence. You can also drape garland around the coop door or windows for a classic holiday look.
- Use Weather-Resistant Decorations: Choose ornaments and other decorations that are safe for outdoor use and won’t be easily damaged by rain or snow. Avoid anything with small, removable parts that could be a choking hazard for your chickens.
- Incorporate Fun Signs: Place a festive sign, like a “Chicken Crossing” sign with a holiday twist or a “Happy Holidays” plaque, near the coop entrance.
6. Decorated Chicken Coop with Bell and Floral Interior
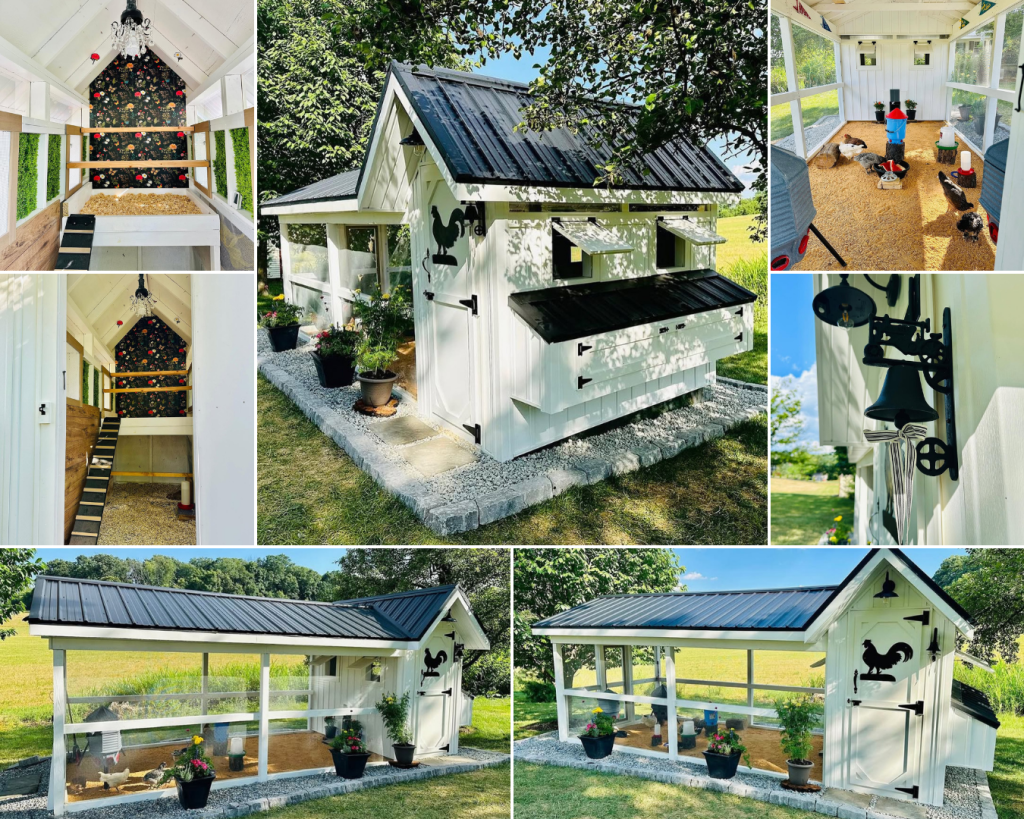
Image: https://www.instagram.com/shafchalet/
What Makes It Unique
This chicken coop is a beautiful blend of rustic charm and cozy comfort, with a standout bell decoration outside that adds a vintage touch. Inside, the floral wallpaper and chandelier create a warm, stylish retreat for the chickens, while the spacious outdoor run with greenery and treats like watermelon makes it a fun and inviting space. The mix of practical design and eye-catching details sets it apart as a special home for your flock.
Materials Needed
- Wooden planks
- Metal roofing
- Chicken wire
- Plywood
- Screws and nails
- Hinges
- Paint (white and black)
- Floral wallpaper
- Artificial green panels
- Bell with mounting bracket
- Ribbons
- Wood shavings
- Small ladder
- Chandelier light fixture
- Planters
How to Do It
- Build the Base Structure: Start with a sturdy frame using wooden planks and top it with metal roofing. Add chicken wire to the outdoor run for safety and airflow.
- Create the Interior: Use plywood for the walls and floor, then paint the outside white with black accents. Inside, attach floral wallpaper to the back wall and add artificial green panels to the sides for a natural feel.
- Add the Bell Decoration: Mount a bell with a bracket outside and tie it with a ribbon for that rustic charm.
- Set Up the Roosting Area: Install a small ladder leading to a raised platform filled with wood shavings where the chickens can rest.
- Enhance with Lighting and Plants: Hang a chandelier light fixture inside for a unique touch, and place planters with flowers around the coop’s base to brighten the outdoor space.
- Stock the Run: Add wood shavings to the floor of the run and toss in treats like watermelon to keep the chickens happy and engaged. Ensure everything is secure and safe before letting them explore!
7. Give Your Coop a Cozy and Chic Interior
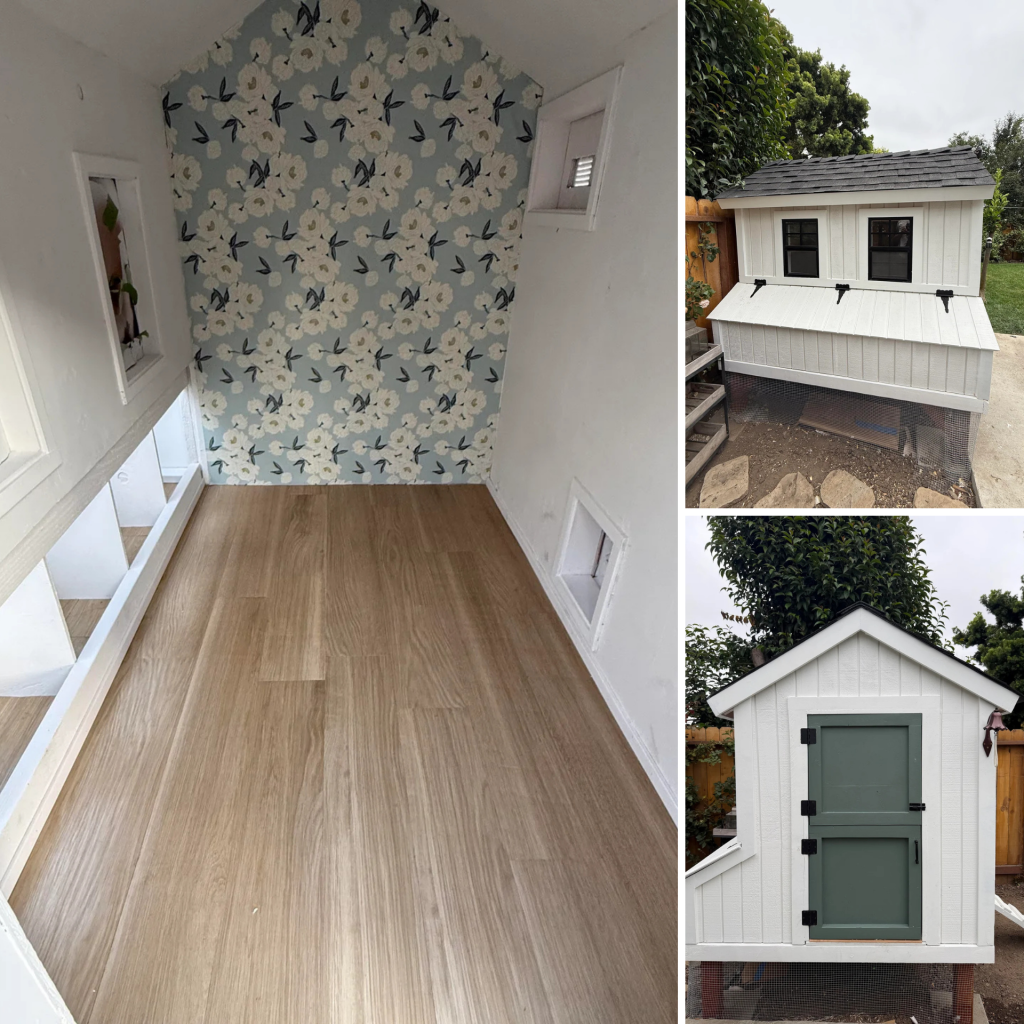
Image: https://www.reddit.com/user/richinthemind/
What Makes It Unique
It brings a level of style and sophistication not often seen in chicken coops. The clean, modern aesthetic is achieved with a bright white interior and a beautiful, floral-patterned accent wall. The use of a durable, easy-to-clean floor adds a practical element to the chic design. It’s a great example of blending form and function to create a truly unique space.
Materials Needed
- Exterior-grade plywood or wood planks
- Exterior paint (white)
- Waterproof vinyl flooring
- Peel-and-stick wallpaper (floral or other pattern)
- Nesting boxes
- Roosting bars
- Latch hooks
How to Do It
- Prep and Paint the Walls: Start with a clean interior. Paint the walls and ceiling a bright white to make the space feel larger and cleaner. This also creates a great backdrop for the other decorative elements.
- Install Durable Flooring: Lay down a waterproof vinyl or linoleum floor. This is not only a chic choice but also makes cleaning a breeze.
- Create an Accent Wall: Choose a bold, patterned peel-and-stick wallpaper and apply it to the back wall of the coop. A floral or botanical pattern adds a charming, elegant touch.
- Add a Roosting System: Build a simple roosting bar system along one or more of the walls. You can keep the wood natural or paint it white to match the walls.
8. Charming Blue Haven Chicken Coop with Hanging Blooms
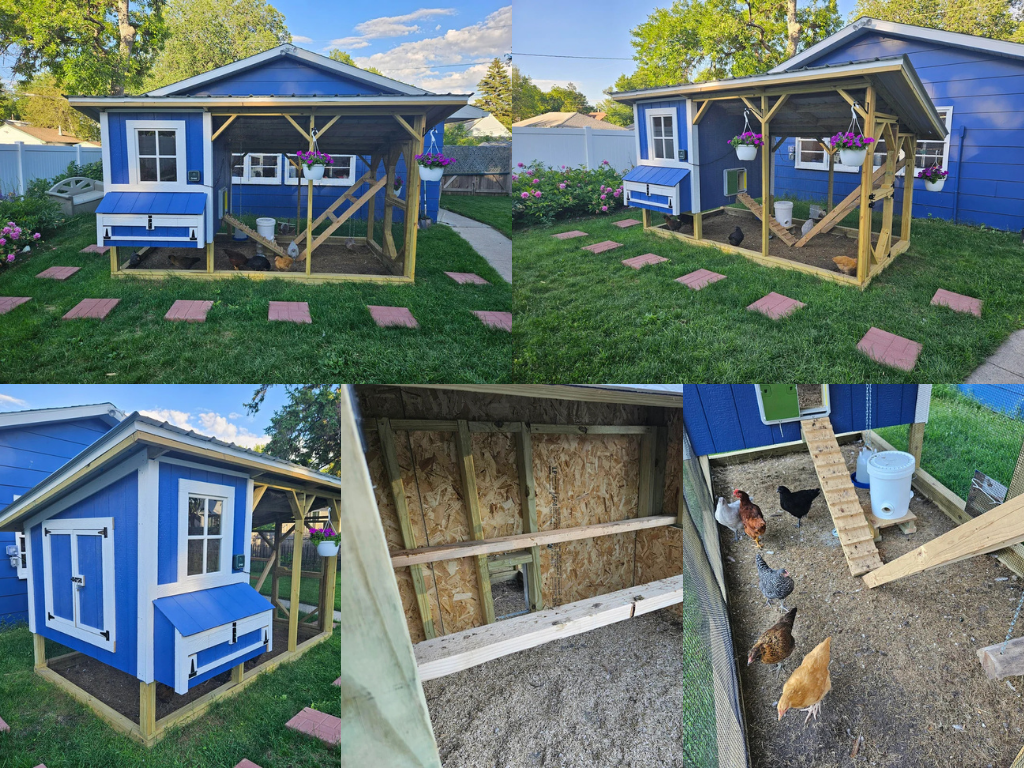
Image: reddit.com
What Makes It Unique
This chicken coop stands out with its vibrant blue exterior that brings a splash of color to your yard, paired with hanging purple flower baskets that add a cozy, welcoming feel. The angled wooden ramp and swinging log perch give the chickens fun spots to explore, while the open run with chicken wire keeps them safe yet connected to the outdoors. It’s a perfect mix of style and practicality.
Materials Needed
- Wooden planks
- Metal roofing
- Chicken wire
- Plywood
- Screws and nails
- Hinges
- Paint (blue and white)
- Window frames
- Hanging flower baskets (with purple flowers)
- Chains
- Log or sturdy branch
- Wood shavings
How to Do It
- Build the Frame: Start with a sturdy frame using wooden planks and add a metal roof to protect from the elements.
- Paint and Assemble: Use plywood for the walls and floor, then paint the exterior blue with white trim for a bold look. Install window frames for light and ventilation.
- Add the Ramp and Perch: Attach an angled wooden ramp for the chickens to climb, and hang a log or branch with chains as a swinging perch for them to enjoy.
- Decorate with Flowers: Hang purple flower baskets from the roof of the run to add a charming touch.
- Finish the Run: Line the run with chicken wire for safety, and spread wood shavings on the ground inside for comfort. Check everything is secure and safe before letting the chickens settle in!
9. Cozy Autumn Glow Chicken Coop Retreat

Image: https://www.instagram.com/sacarroll4
What Makes It Unique
This chicken coop gets a warm autumn makeover with rich orange and brown tones painted on the exterior, giving it a cozy, seasonal vibe. Hanging lanterns with a soft glow adds a magical touch, especially at dusk, while scattered fall leaves and mini pumpkins around the base bring the outdoors inside. The open run with chicken wire keeps it airy, and a wooden perch offers a comfy spot for the chickens to roost. It’s perfect for creating a festive yet functional space.
Materials Needed
- Wooden planks
- Metal roofing
- Chicken wire
- Plywood
- Screws and nails
- Hinges
- Paint (orange and brown)
- Hanging lanterns
- Mini pumpkins
- Artificial or real fall leaves
- Wooden perch
- Wood shavings
How to Do It
- Build the Frame: Start with a solid frame using wooden planks and top it with a metal roof for weather protection.
- Paint the Exterior: Use plywood for the walls and floor, then paint the outside in warm orange and brown shades to capture that autumn feel.
- Set Up the Run: Add chicken wire to the run for safety and ventilation.
- Add Decor: Hang lanterns from the roofline to create a soft glow, and scatter mini pumpkins and fall leaves around the base for a festive look.
- Install the Perch: Attach a wooden perch inside the run for the chickens to rest on.
- Finish Up: Spread wood shavings on the ground, then check that everything is secure and safe for the chickens to enjoy their autumn retreat!
10. Sunny Yellow Springtime Chicken Coop Delight

Image: https://www.instagram.com/thehenhousecollection/
What Makes It Unique
This coop bursts with cheer thanks to its bright yellow exterior that feels like a ray of sunshine, paired with a soft green roof that hints at springtime. Hanging mason jar planters with tiny flowers adds a cute, garden vibe, while a little wooden ladder inside gives the chickens a fun way to climb. The chicken wire run keeps them safe and lets in plenty of fresh air, making it a happy, lively spot for your flock.
Materials Needed
- Wooden planks
- Metal roofing (green)
- Chicken wire
- Plywood
- Screws and nails
- Hinges
- Paint (yellow)
- Mason jars (for planters)
- Small flowers or succulents
- Wooden ladder
- Wood shavings
How to Do It
- Build the Frame: Start with a solid frame using wooden planks and add the green metal roof for a pop of color.
- Paint and Assemble: Use plywood for the walls and floor, then paint the outside a sunny yellow to brighten things up.
- Set Up the Run: Add chicken wire to the run to keep it secure and ventilated.
- Decorate: Hang mason jars filled with small flowers or succulents from the roofline for that spring feel.
- Add the Ladder: Place a wooden ladder inside for the chickens to explore and roost on.
- Final Touch: Spread wood shavings on the ground, check that everything’s sturdy, and let your chickens enjoy their new springtime home!