10 Backyard Chicken Coop Ideas That Keep Hens Happy
Think of a chicken coop like a tiny Airbnb. Your hens don’t need marble countertops, but they do want comfort, fresh air, and a little room to spread their wings. Give them that, and they’ll reward you with content clucks and baskets of fresh eggs.
So if you want your hens happy, here are 10 backyard chicken coop ideas that can make it possible! The best part? They work for small backyards, too!
Backyard Chicken Coop Ideas
1. The Classic Red Barn Coop
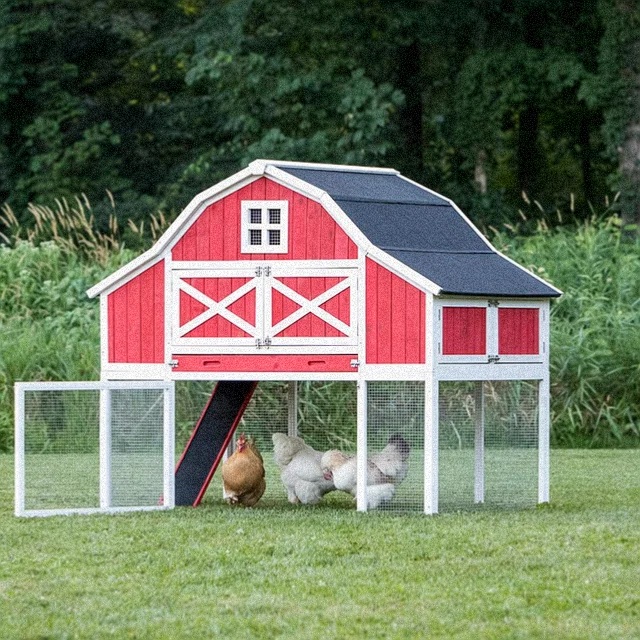
Image: https://www.reddit.com/user/TiredMom234/
What Makes It Unique
This coop stands out because of its traditional barn aesthetic. The iconic red color, white trim, and gambrel roof give it a familiar, farmhouse look. The elevated structure is also a key feature, as it separates the roosting and nesting area from the ground, which can improve ventilation and cleanliness.
Materials Needed
- Pressure-treated lumber for the frame and legs
- Plywood for the walls and nesting boxes
- Red barn siding or paint to achieve the classic look
- Asphalt shingles for the roof
- Hardware cloth for the enclosed run area
- Door hinges, latches, and screws
- A small ramp for the chickens to access the elevated coop
How to Do It
- Build the Elevated Frame: Construct a sturdy base using pressure-treated lumber, ensuring it’s level and stable.
- Frame the Walls and Roof: Build the barn-style structure on top of the base. This includes the four walls and the distinctive gambrel roof frame.
- Attach the Siding and Roofing: Cover the exterior with plywood and then either paint it red or attach red siding. Install the asphalt shingles on the roof to make it waterproof.
- Create the Run: Enclose the area underneath and to the side of the coop with a hardware cloth run. This creates a secure outdoor space for the chickens.
- Install the Ramp and Doors: Attach a ramp so the chickens can easily enter and exit the elevated coop. Install doors with secure latches for easy access to the interior for cleaning and egg collection.
- Add Interior Features: Inside the coop, install roosting bars and nesting boxes. Ensure they are positioned correctly to encourage happy, healthy hens.
2. A-Frame Coop with Chain-Link Run
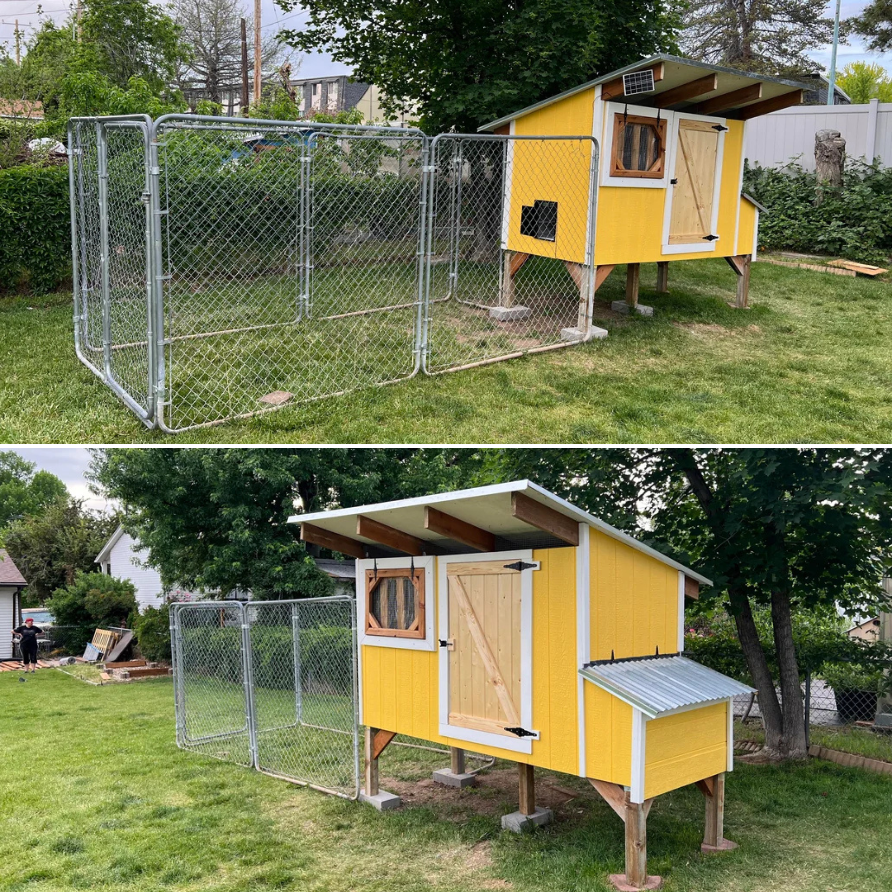
Image: https://www.reddit.com/user/TransporterNate/
What Makes It Unique
The most unique aspect of this coop is its innovative use of a pre-made or custom chain-link kennel as the primary run. This offers superior predator protection and durability compared to traditional chicken wire, and the walk-in size makes cleaning and interacting with your hens much easier. The elevated, slanted-roof coop portion fits neatly inside the run, creating a harmonious and secure habitat. The vibrant yellow color adds a cheerful and modern touch to a typically rustic structure.
Materials Needed
- Prefabricated chain-link dog kennel kit (or chain-link fencing and posts for a custom build)
- Lumber for the A-frame coop (e.g., 2x4s and plywood)
- Yellow exterior paint
- Roosting bars and nesting boxes
- Hardware cloth for coop ventilation and to reinforce the bottom of the run
- Corrugated metal or asphalt shingles for the coop roof
- Hinges, latches, and screws
- A small ramp for the chickens
How to Do It
- Set Up the Run: Assemble the chain-link kennel kit in a suitable location in your backyard. Ensure the ground is level and that you have a secure latch on the door. To prevent predators from digging, bury hardware cloth or pavers around the perimeter of the run.
- Build the A-Frame Coop: Construct a small A-frame structure that will fit comfortably inside the run. The slanted roof design is simple to build and helps with water runoff.
- Install Interior Features: Inside the A-frame, add roosting bars for your chickens to sleep on and nesting boxes for egg-laying. Ensure there is adequate ventilation.
- Finish the Coop Exterior: Attach the roof material and paint the exterior of the coop in your desired color (like the bright yellow in the image).
- Place and Secure the Coop: Move the completed A-frame coop inside the chain-link run and secure it to the ground to prevent it from shifting. Install a small ramp for the chickens to access their elevated roosting area.
3. The Whimsical Cottage Coop with Integrated Aviary Run
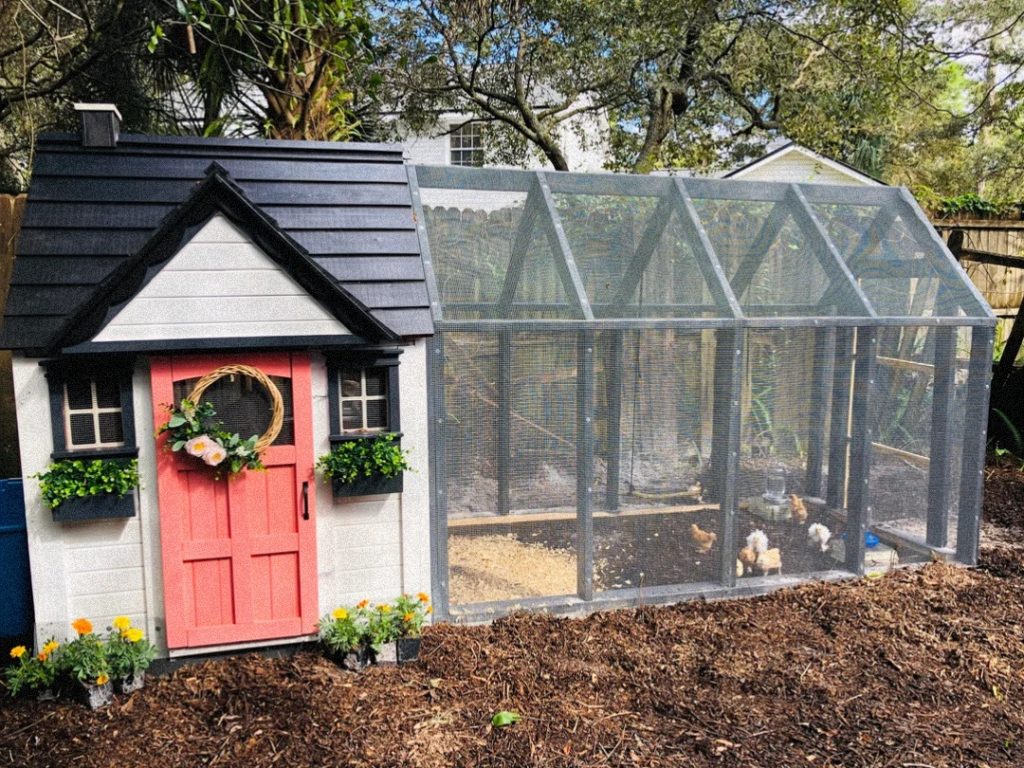
Image: https://www.reddit.com/user/PeepBiscuit/
What Makes It Unique
This coop stands out due to its strong resemblance to a miniature house, complete with a pitched roof, decorative windows, and even window boxes. The vibrant coral-colored door with a wreath adds a touch of whimsy. Crucially, it features a seamlessly integrated, tall, walk-in run that resembles an aviary, providing ample vertical and horizontal space for the chickens to explore while keeping them safe from predators. The covered section of the run also offers additional shelter.
Materials Needed
- Plywood and lumber for the cottage structure
- White and black exterior paint, and coral-colored paint for the door
- Asphalt shingles for the roof
- Hardware cloth or welded wire for the aviary run
- Lumber (e.g., 2x4s, 2x2s) for the run frame
- Windows and decorative shutters (can be salvaged or custom-built)
- Flower boxes and artificial flowers/greenery
- Decorative wreath
- Hinges, latches, and screws
- Roosting bars and nesting boxes for the interior
- Wood chips or straw for the run floor
How to Do It
- Build the Cottage Coop: Construct the primary house-like structure. This includes framing the walls, adding the pitched roof, and cutting out openings for the door and windows.
- Add Decorative Elements: Install the door, windows, shutters, and window boxes. Paint the exterior to achieve the cottage look (white siding, black trim, coral door). Add the wreath to the door.
- Shingle the Roof: Install asphalt shingles on the coop roof for weather protection.
- Construct the Aviary Run Frame: Build a sturdy, tall frame for the integrated run using lumber, ensuring it extends from the side of the cottage coop. The frame should include a pitched roof for good water drainage.
- Enclose the Run: Cover the entire run frame with hardware cloth or welded wire, making sure there are no gaps for predators. Install a secure access door into the run.
- Add Interior Features: Inside the cottage, install roosting bars and nesting boxes.
- Floor the Run: Spread a layer of wood chips or straw on the floor of the run for comfort and absorption.
- Landscape: Place small potted plants or flowers around the base of the coop to enhance the garden aesthetic.
4. Farmhouse-Style Walk-In Coop with External Nesting Boxes
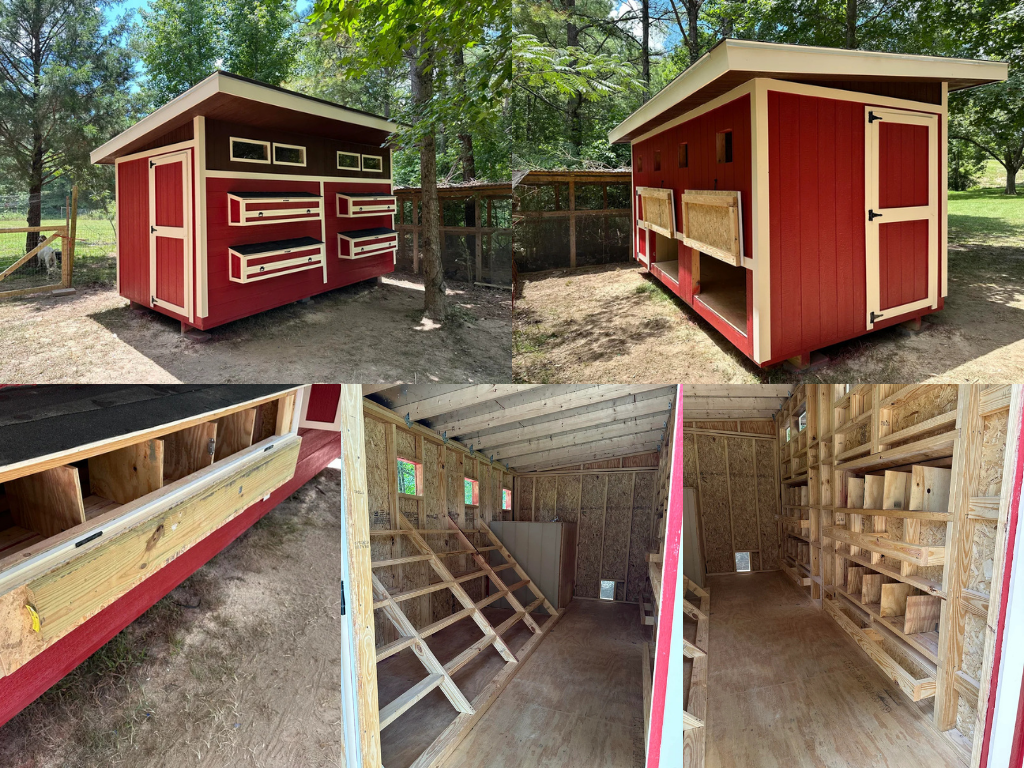
Image: https://www.reddit.com/user/Aggressive_Field_976/
What Makes It Unique
What truly sets this coop apart is its substantial size and walk-in design, allowing owners to comfortably stand upright inside for cleaning, feeding, and interacting with their flock. The ingenious external nesting boxes are a game-changer for egg collection, as they can be accessed from outside the coop, minimizing disruption to the hens and keeping the interior cleaner. The multiple roosting options, including a large A-frame structure, cater to a larger flock’s needs.
Materials Needed
- Dimensional Lumber (2x4s, 2x6s) for framing walls, roof, and interior structures (roosting bars, nesting box supports)
- Plywood or OSB for subfloor, walls, and nesting box construction
- Red Barn Siding (or exterior-grade plywood painted red) for the main exterior
- White Trim Boards for corners, door frame, and nesting box trim
- Asphalt Shingles or Metal Roofing for the roof
- Hardware Cloth for small windows and any ventilation openings
- Exterior-grade door and hardware
- Hinges, latches, and screws
- Small windows for light and ventilation
- Pressure-treated skids/blocks for the base if not on a permanent foundation
How to Do It
- Build a Solid Foundation: Start with a level base. This coop appears to be built on treated skids, making it somewhat portable if needed, but a concrete slab or gravel pad would also work.
- Frame the Structure: Construct the wall frames, including openings for the walk-in door and multiple windows. The roof framing shows a slight pitch, which is excellent for water runoff.
- Install Interior Features: Before fully enclosing, build and install the extensive internal framework for roosting bars (like the large A-frame structure) and the back wall with multiple nesting boxes. The external access to the nesting boxes will require careful planning during this stage.
- Enclose the Exterior: Attach the plywood or OSB sheathing to the walls and roof. Then, install the red siding and white trim to achieve the classic farmhouse look.
- Build and Install External Nesting Boxes: Construct the external nesting boxes with hinged lids for easy egg collection. These are integrated into the side wall of the coop.
- Roofing and Windows: Install the roofing material to make the coop weather-tight. Add hardware cloth to all window openings for security, and consider adding small sashes for additional weather protection.
- Final Touches: Install the main walk-in door and any smaller access doors for the chickens. Ensure all latches are predator-proof. You can also add interior features like feeders, waterers, and a thick layer of bedding.
5. The Lean-To Coop with Elevated Living and Integrated Run
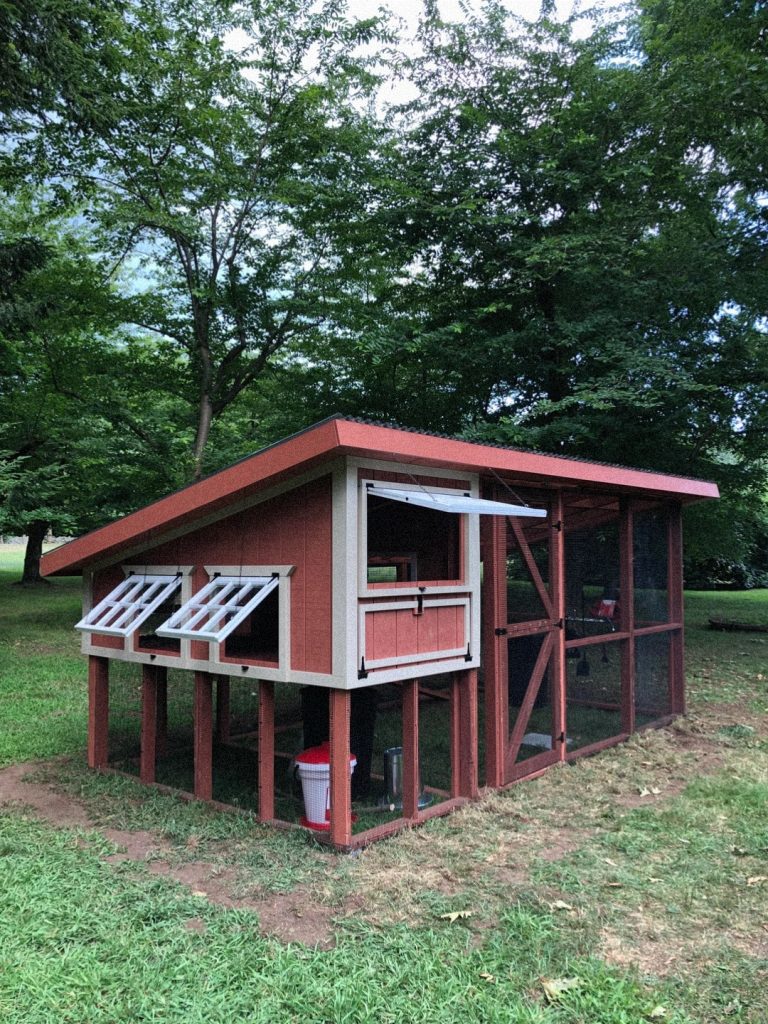
Image: https://www.reddit.com/user/schnoodz/
What Makes It Unique
This design has a clever integration of an elevated coop with a ground-level run, all under a continuous, sloping lean-to roof. The single-roof structure provides comprehensive protection from sun and rain for both the hens’ nesting area and their outdoor run. The design is also very functional, with easy access points, excellent ventilation from the front windows (with swinging shutters), and a sheltered area underneath the coop for the chickens to dust bathe or seek shade. The warm, earthy color palette blends nicely into a natural, tree-filled backyard.
Materials Needed
- Lumber (2x4s, 4x4s, etc.) for the elevated frame and the run structure
- Plywood or OSB for the walls, floor, and roof decking of the coop
- Corrugated metal or asphalt shingles for the roof
- Exterior-grade paint or stain in a warm, natural color
- Hardware cloth for the run enclosure and window screens
- Hinges and latches for the coop door and shutters
- A ramp for the chickens to access the coop
- Nesting boxes and roosting bars for the interior
How to Do It
- Build the Elevated Frame: Start by constructing a sturdy, elevated box frame for the coop portion. This will be the main structure that houses the hens at night.
- Add the Lean-To Roof: Extend the roof frame from the top of the coop, creating a single, continuous slope that covers both the coop and the future run area.
- Enclose the Coop: Attach plywood to the walls and floor of the elevated coop. Cut out openings for the entrance door and windows. Build and install the swinging shutters for the windows.
- Create the Run: Using the existing roof as a guide, frame out the ground-level run and securely attach hardware cloth to all sides. Ensure the hardware cloth extends into the ground to prevent digging predators.
- Add Final Details: Install the coop access ramp, the main door, and any latches. Inside the coop, place roosting bars and nesting boxes. Paint or stain the exterior to protect the wood and give it a finished look.
6. The Compact Modern Farmhouse Coop

Image: https://www.reddit.com/r/BackYardChickens/comments/1dr01qq/built_my_first_chicken_coop/
What Makes It Unique
The standout feature of this coop is its charming facade, which echoes a miniature farmhouse. The color scheme is a bold, modern twist on a traditional style. The design is smart and space-saving, with the elevated coop and an integrated, covered run. The run provides a secure, all-weather outdoor area for the chickens. A notable detail is the easily accessible nesting box with a hinged lid, making egg collection a simple task from outside the coop.
Materials Needed
- Pressure-treated lumber for the base and run frame
- Plywood or exterior-grade siding for the coop walls
- Vibrant blue and white exterior paint
- Asphalt shingles for the roof
- Hardware cloth for the run and windows
- Door hinges, latches, and screws
- A small ramp for the chickens to access the coop
- Nesting box hardware (hinges and latches)
- Roosting bars for the interior
- Optional: Hanging flower baskets for a decorative touch
How to Do It
- Build the Base and Frame: Construct the base of the run using pressure-treated lumber, as this part will be in contact with the ground. Build the elevated coop frame on one side of the base.
- Add the Roof: Frame a sloping roof that covers both the coop and a portion of the run for a protected, shady area. Cover with plywood and asphalt shingles.
- Enclose the Coop: Cover the coop walls with siding, making sure to cut out openings for the main access door, the windows, and the nesting box area.
- Construct and Attach the Nesting Box: Build the nesting box with a hinged lid for external access and attach it to the side of the coop.
- Secure the Run: Enclose the run area with hardware cloth, securely stapling it to the frame. Install a small access door for cleaning.
- Add Interior Features: Inside the elevated coop, install roosting bars and nesting boxes. A ramp with small steps provides easy access for the chickens.
- Paint and Decorate: Paint the coop in your chosen colors. Add decorative elements like trim around the doors and windows, and perhaps some hanging flower baskets to complete the look.
7. The Cedar-Stained Cottage Coop with Landscaped Run
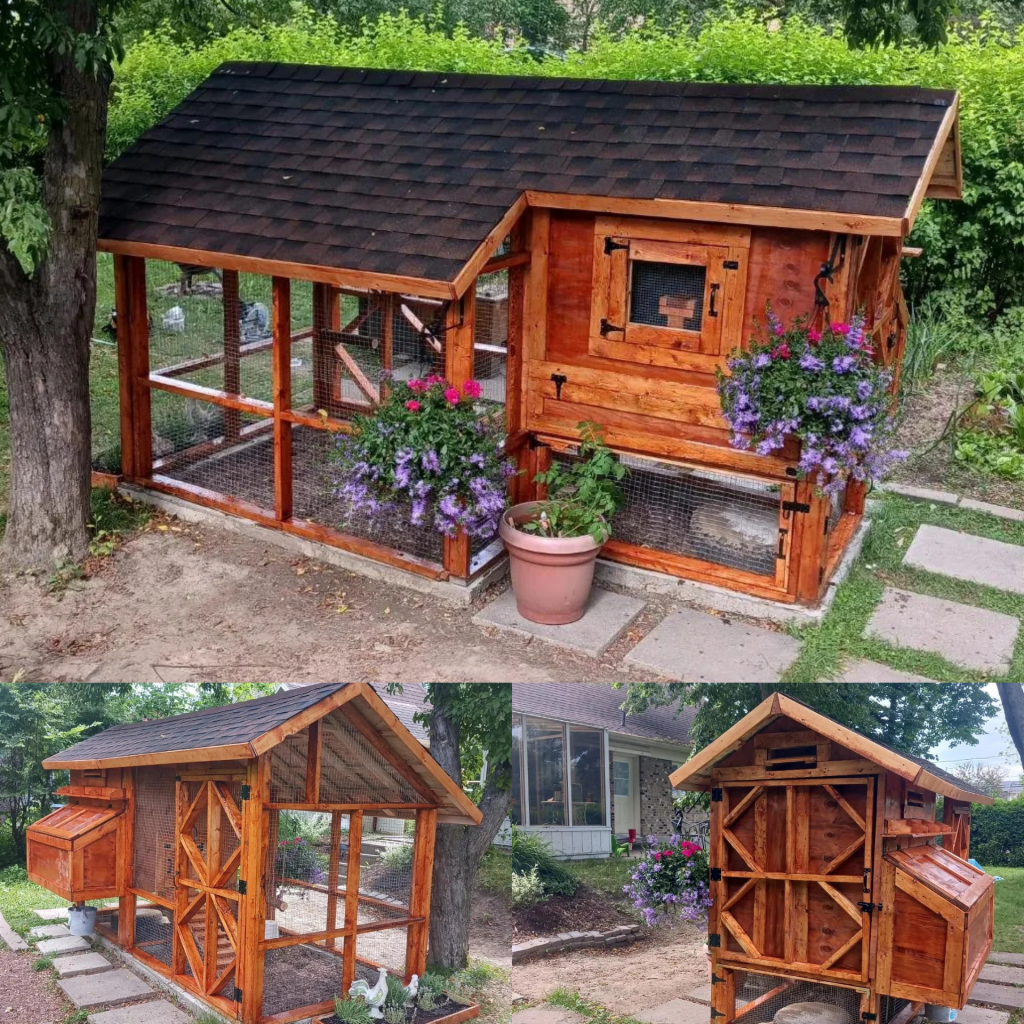
Image: https://www.reddit.com/user/IllustriousWorry4741/
What Makes It Unique
The coop and run are integrated into the garden itself. The use of stepping stones, the small built-in planter box at the front, and the hanging flower baskets create a cohesive and charming garden scene rather than just a standalone coop. The detailed woodwork, including the X-pattern on the doors and the beautiful cedar stain, gives it a high-quality, handcrafted feel. The clever design also includes an easily accessible nesting box with a hinged lid for convenient egg collection from the outside.
Materials Needed
- Lumber (2x4s, 2x2s) for the coop and run frame
- Plywood or siding for the coop walls
- Cedar or pine wood for the exterior, finished with a cedar-toned stain and sealant
- Asphalt shingles for the pitched roof
- Hardware cloth for the run and ventilation openings
- Door hinges, latches, and screws
- Wood blocks or pavers for the base to keep it off the ground
- Nesting box hardware
- Hanging flower baskets and planters for decoration
How to Do It
- Build the Foundation and Frame: Construct a sturdy base for the coop and run using pressure-treated lumber, lifting it off the ground with pavers or blocks to prevent rot. Frame the main coop structure and the attached run.
- Add Siding and Roofing: Cover the coop walls with wood and apply the cedar-toned stain and sealant. Install the pitched roof with asphalt shingles.
- Enclose the Run: Frame the run and securely attach hardware cloth to all sides, including the roof, to provide a predator-proof enclosure. Install a walk-through door for easy access.
- Install Interior Features: Inside the main coop, add roosting bars for the chickens to sleep on. Build and install the external nesting box with its hinged lid for easy egg collection.
- Add Decorative and Functional Details: Install the doors on the coop and run, making sure they are secured with latches. Hang flower baskets and arrange pots to soften the look of the structure and blend it into the garden. Fill the run with a suitable substrate like wood chips or sand.
8. The Grand Farmhouse Coop with Walk-In Run

Image: https://www.reddit.com/user/jewing18/
What Makes It Unique
The most striking feature of this coop is its impressive size and polished appearance. The bright white board-and-batten siding, black trim, and stylish barn lights give it a sophisticated and well-designed look. The coop is elevated, providing a protected, shady area underneath, but the real star is the attached, full-sized walk-in run. This enclosed run is tall enough for a person to stand inside, making cleaning, feeding, and flock management incredibly easy. It also includes an automated chicken door, ensuring the hens are safely locked in at night without the owner needing to be there at dusk.
Materials Needed
- Lumber (2x4s, 4x4s, etc.) for the entire frame
- Board-and-batten style siding (or plywood with trim boards for the same effect)
- Metal roofing for durability and a modern look
- White exterior paint with black trim paint
- Hardware cloth for the run and ventilation
- Stylish barn lights and electrical wiring (optional, but recommended)
- Hinges and latches for the coop and run doors
- An automatic chicken coop door
- A ladder or ramp for the chickens to access the coop
- External nesting box with hinged lid
- Roosting bars for the interior
How to Do It
- Construct the Elevated Coop: Build a sturdy, elevated box frame for the main coop structure, complete with a door opening and openings for ventilation and the external nesting box.
- Add Siding and Roof: Attach the board-and-batten siding to the exterior and cover the roof with metal sheeting. A small overhang is included to protect the walls from rain.
- Build the Walk-In Run: Frame a large, walk-in run that is attached to the main coop. The frame should be tall enough for a person to stand in and sturdy enough to support the hardware cloth enclosure.
- Enclose with Hardware Cloth: Cover the entire run with heavy-duty hardware cloth, from floor to ceiling, to create a secure, predator-proof area. Install a walk-through door on the run.
- Install All Features: Add the hinged access doors to the coop and the nesting box. Install the automatic chicken door at the base of the ladder. Place the barn lights on the exterior of the coop. Inside, install roosting bars and the nesting boxes.
- Finishing Touches: Paint the entire structure with the white and black color scheme. The result is a coop that is as beautiful as it is functional.
9. The Homestead Coop with Garden Bed Run
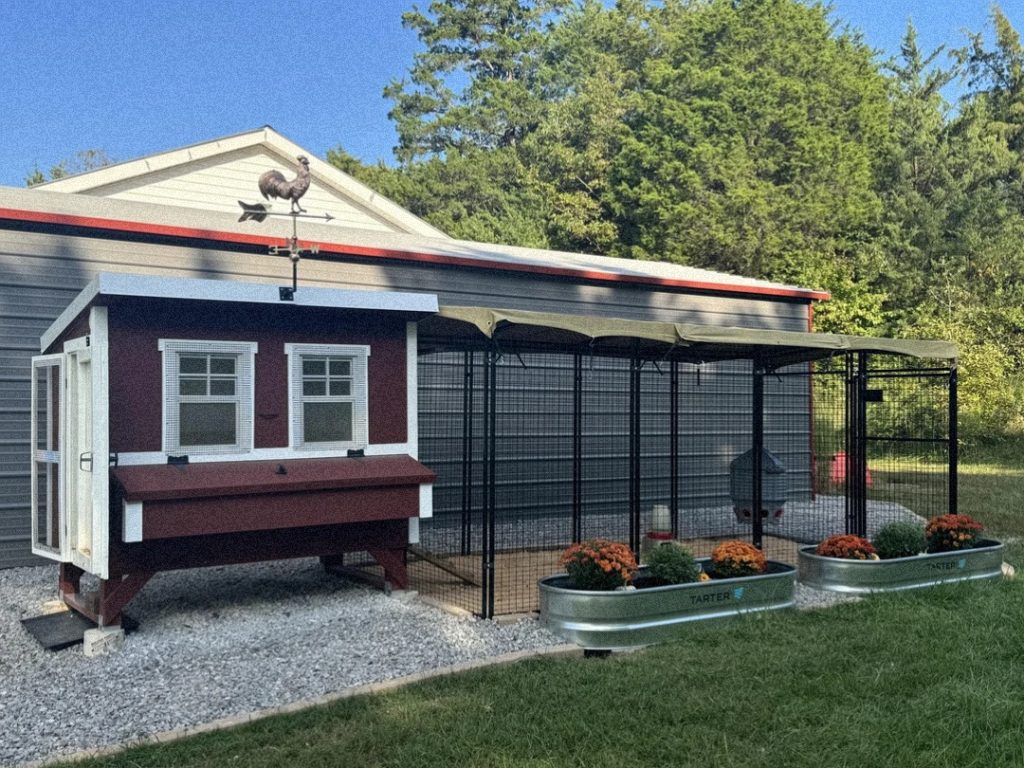
Image: https://www.reddit.com/user/Jim_in_tn/
What Makes It Unique
This coop’s appeal lies in its clean lines, practical layout, and attention to detail. The use of deep burgundy and white siding creates a classic, barn-like feel, while the small decorative windows add a touch of character. The large, attached run provides ample space for the chickens to forage and exercise. The run itself is unique, utilizing large metal troughs as raised garden beds, which look beautiful with flowers. It also serves a dual purpose by keeping the chickens out of the main garden area. The addition of a weathervane on the roof adds a charming, traditional homestead feel.
Materials Needed
- Exterior-grade plywood or siding for the coop walls
- Lumber (2x4s, etc.) for the coop frame
- Deep burgundy and white exterior paint
- Corrugated metal roofing
- Large metal troughs for garden beds
- Hardware cloth for the run enclosure and windows
- Gravel for the run floor to ensure good drainage
- Door hinges, latches, and screws
- Weathervane (optional)
- Roosting bars and nesting boxes for the interior
How to Do It
- Build the Coop Structure: Start with the main elevated coop. Frame the walls and roof, leaving openings for windows, the chicken door, and nesting boxes.
- Add Exterior Details: Cover the coop with siding and paint it in the deep burgundy and white color scheme. Install the windows and door.
- Construct the Run: Build a large, enclosed run attached to the coop. Use a combination of lumber and metal posts to create a sturdy frame.
- Cover with Roofing and Hardware Cloth: Extend a roof over the run to provide shade and protection from the elements. Cover the sides with heavy-duty hardware cloth to keep predators out.
- Create the Garden Beds: Place the metal troughs in front of the run, fill them with soil, and plant flowers or herbs. This adds a beautiful touch and a nice separation from the rest of the yard.
- Finishing Touches: Add roosting bars and nesting boxes inside the coop. Install a weathervane on the roof for a classic look and fill the run with gravel for a clean, dry surface.
10. The Tree House Conversion Chicken Coop
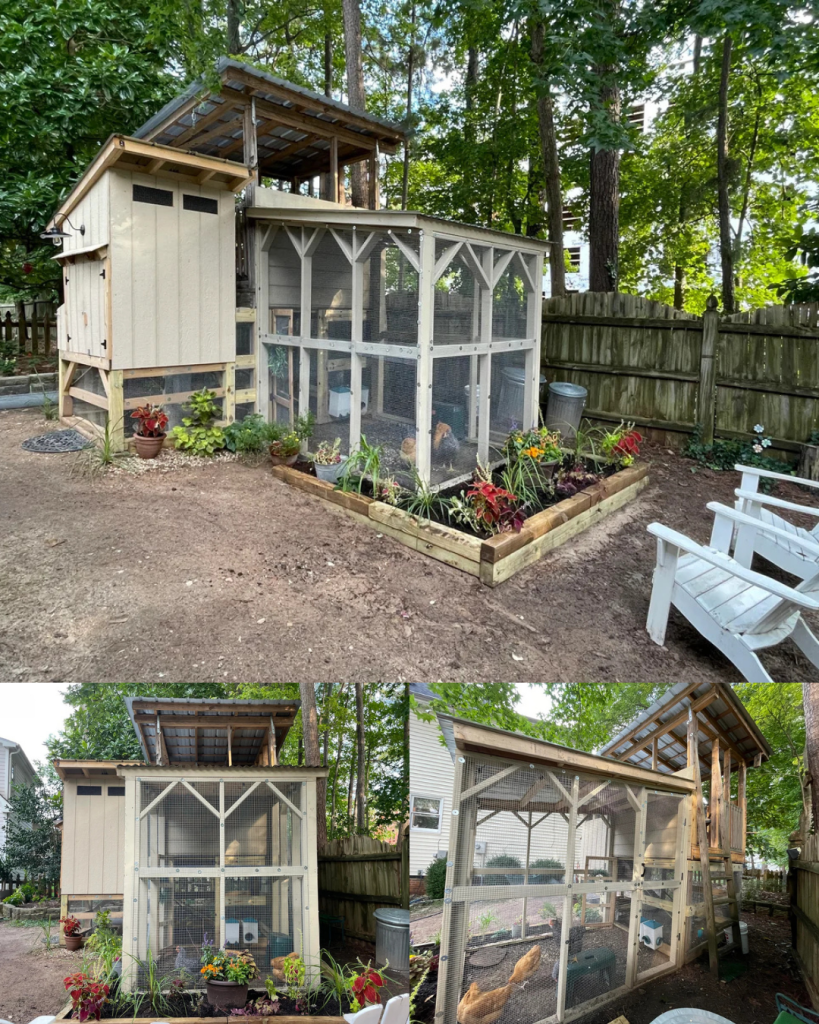
Image: https://www.reddit.com/user/katefromraleigh/
What Makes It Unique
This design transforms an old tree house into an elevated, secure, and multi-level chicken sanctuary. It provides the chickens with a highly secure roosting area, safe from most ground-level predators. The design extends from the tree house to an expansive, well-framed run on the ground, creating a secure, enclosed world for the chickens. The multi-tiered roof on both the run and the coop portion adds to its custom, handcrafted feel.
Materials Needed
- An existing tree house or elevated playhouse structure
- Lumber (2x4s, etc.) to build the run frame and add any missing walls to the coop portion
- Corrugated metal or plywood and roofing paper for the roof
- Hardware cloth for the run enclosure, windows, and any ventilation openings
- A ladder or ramp for the chickens to access the elevated coop
- Door hinges, latches, and screws
- Exterior-grade paint or stain to protect the wood
- Roosting bars and nesting boxes for the interior
How to Do It
- Secure the Tree House: The first step is to reinforce the existing tree house structure to ensure it’s stable and completely secure. Enclose any open sides with wood or hardware cloth to create the coop’s interior living space.
- Build the Run: Frame a large, ground-level run that connects directly to the tree house. The frame should be sturdy enough to support the wire and provide a secure space for the chickens to roam.
- Enclose the Run: Cover all open sides of the run with hardware cloth, ensuring it is stapled or nailed securely and extends into the ground to prevent predators from digging underneath.
- Add Roofing: Cover the run with a roof to provide a dry, shady area for the chickens. The roof can be made from corrugated metal or plywood or roofing paper.
- Install Access Points: Create a small, hinged door for the chickens to enter and exit the coop. Build and attach a ladder or ramp from the run up to the coop entrance. Also, install a main access door on the run for easy cleaning and maintenance.
- Add Interior Features: Inside the elevated coop, install roosting bars and nesting boxes to provide a comfortable and functional living space for your flock.