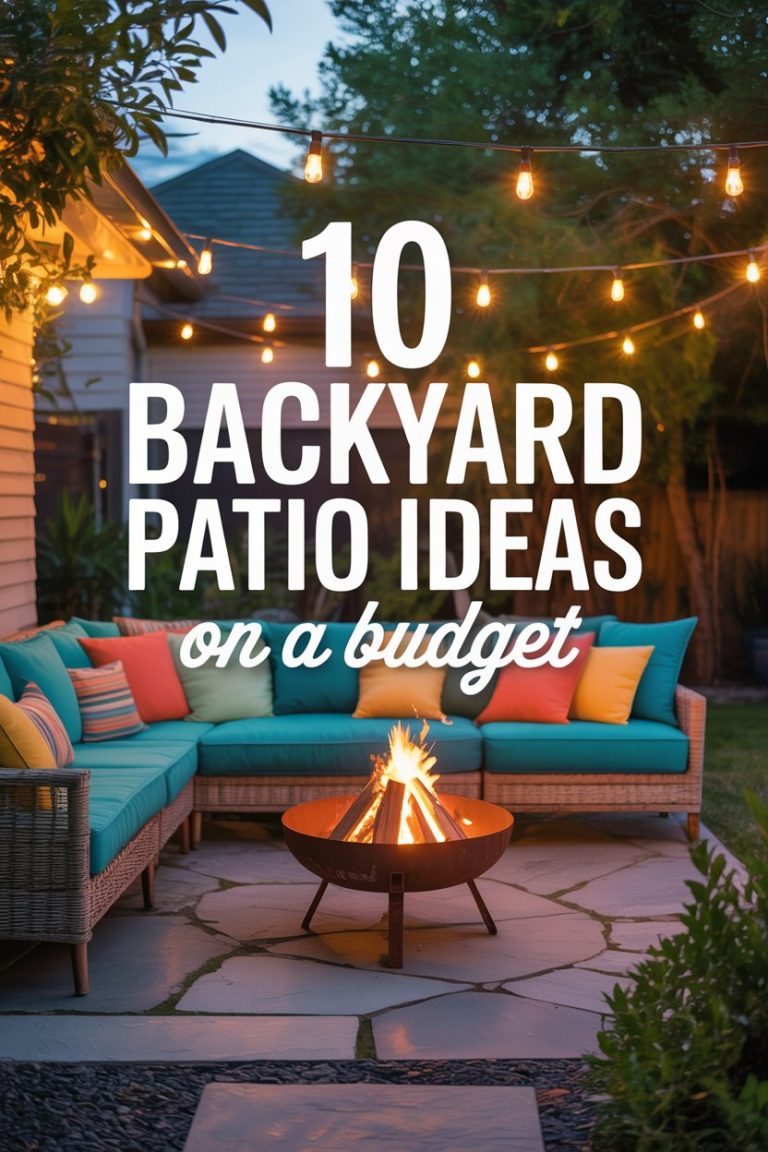
10 Backyard Patio Design Layouts That Maximize Space
Ever look at your backyard and wonder why it feels smaller than it actually is? The truth is, it’s not the size, but the layout. With the right design, even the tiniest patio can feel like a spacious outdoor lounge.
These 10 layouts aren’t just clever. They’ll completely change the way you use your backyard.
Backyard Patio Design Layouts
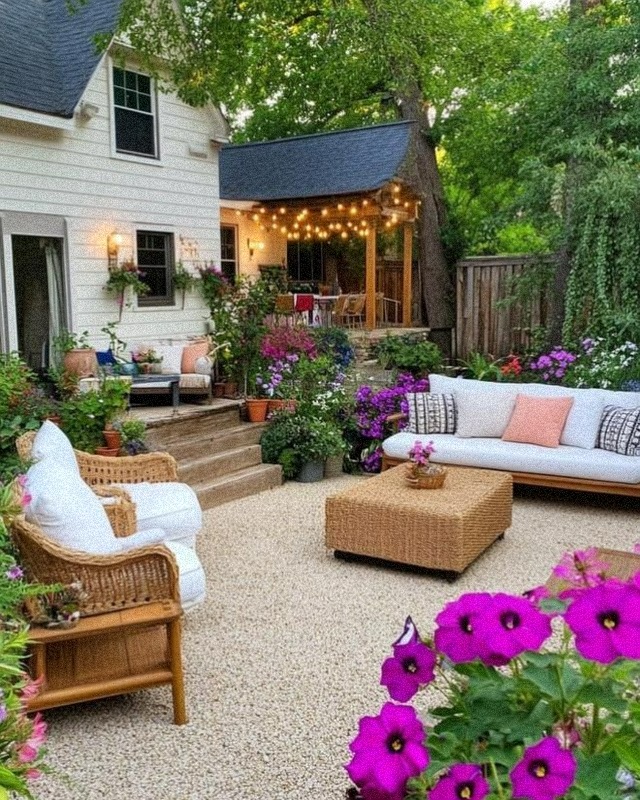
Image: https://www.instagram.com/lovely.harbor/
1. The Multi-Zone Garden Patio
What Makes It Unique
This patio stands out by creating multiple functional “rooms” in a single backyard. A raised deck serves as an outdoor dining or lounge area, connecting seamlessly to the house, while a lower gravel patio provides a separate, comfortable space for conversation around a coffee table. Lush container gardens and surrounding flower beds blur the line between the hardscaping and the natural landscape, making the entire area feel like an intimate, private retreat.
Materials Needed
- Gravel (for the patio surface)
- Decking material (wood or composite)
- Deck railing (optional)
- Steps (for the transition)
- Outdoor sectional sofa and chairs
- Wicker or wood coffee table
- Cushions and pillows
- String lights
- Planters and assorted potted plants
- Garden soil and various plants
How to Do It
- Plan the Layout: Start by determining the size and placement of your elevated deck and the lower patio. The deck should be close to the house for easy access. Mark out the areas.
- Build the Deck: Construct a raised wooden or composite deck with steps leading down to the ground level. Ensure the structure is sturdy and properly supported.
- Create the Gravel Patio: Once the deck is complete, prepare the lower area. Dig down a few inches, lay down landscape fabric, and then pour and rake the gravel evenly to create a flat, stable surface.
- Add Plants and Lighting: Place planters and arrange potted plants on both the deck and the gravel patio. Install string lights to define the space and provide ambiance for evening use.
- Place Furniture: Arrange your outdoor furniture on the gravel patio and on the deck to create separate, inviting conversation areas.
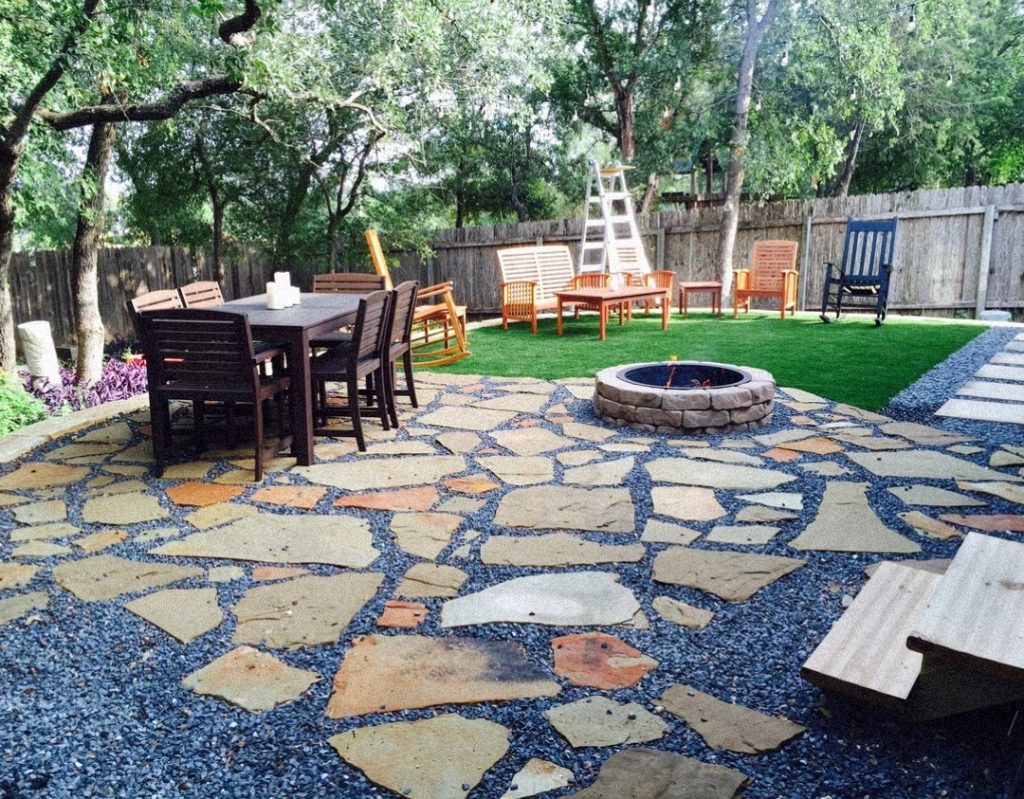
Image: https://www.reddit.com/user/texyman25/
2. The Natural Stone and Gravel Patio with Fire Pit
What Makes It Unique
The use of irregular natural stones set within a bed of gravel offers a more organic and less formal look compared to uniform pavers. The incorporation of a built-in fire pit encourages gathering and extends the usability of the space into cooler evenings. This design seamlessly blends with a natural backyard setting.
Materials Needed
- Large, irregular natural stone pavers
- Gravel (various sizes for base and top layer)
- Edging material (optional, to contain the gravel)
- Fire pit materials (stone or concrete blocks, metal fire ring)
- Sand or leveling base for pavers and a fire pit
- Optional: Landscape fabric to suppress weeds under the gravel
How to Do It
- Plan the Layout: Determine the desired size and shape of your patio and fire pit area. Mark it out on the ground.
- Excavate the Area: Dig down several inches to create a base for your patio. The depth will depend on the thickness of your pavers and gravel layers.
- Install Edging (Optional): If you want a defined border for your patio, install edging material around the perimeter.
- Lay the Base: Add a layer of compacted gravel for drainage and stability. You may choose to put down landscape fabric before this layer to help prevent weeds.
- Position the Pavers: Arrange the natural stone pavers on top of the gravel base. Leave irregular gaps between them. You may need to add or remove gravel under individual stones to level them.
- Fill the Gaps With Gravel: Once the pavers are in place, fill the spaces between them with smaller gravel. Sweep the gravel to ensure it settles into the gaps.
- Build the Fire Pit: Choose your fire pit location and level the ground. If using blocks, stack them in a circle to the desired height. A metal fire ring can be placed inside for added durability. Ensure it complies with local regulations regarding fire pits.
- Add Furniture and Enjoy: Once the patio and fire pit are complete, arrange your outdoor furniture and get ready to enjoy your new space.
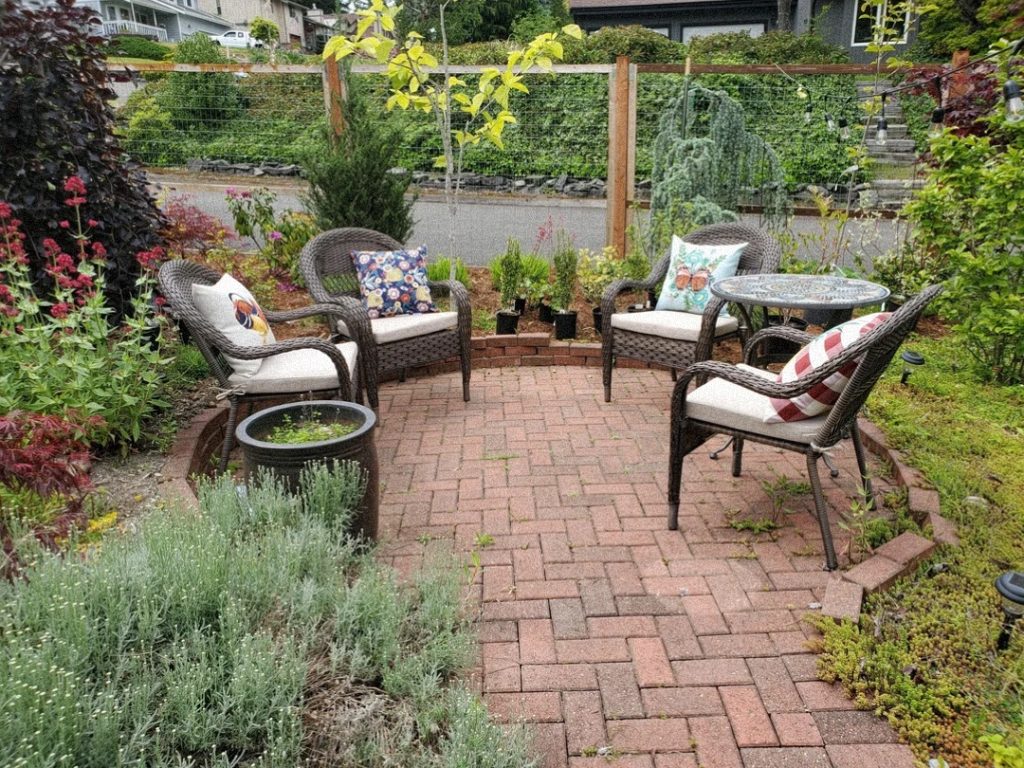
Image: https://www.reddit.com/user/monkey_trumpets/
3. The Brick Nook Patio
What Makes It Unique
This design excels at making a small, otherwise unused space feel deliberate and functional. The circular layout breaks up the straight lines of the surrounding garden and provides a central point for a seating area. The herringbone pattern of the bricks adds a touch of classic sophistication, while the low brick border keeps the space tidy and contained. This patio is an ideal solution for maximizing a small corner of a yard, turning it into a beautiful, purposeful retreat.
Materials Needed
- Red brick pavers
- Sand
- Gravel
- Outdoor wicker furniture
- Pillows
- Side table
- Landscape fabric (optional)
How to Do It
- Mark the Area: Use a string or spray paint to outline the circular shape of your patio.
- Excavate: Dig out the area to a depth of about 6-8 inches, ensuring the ground is level.
- Lay the Base: Add and compact a layer of gravel, followed by a layer of sand. You may also lay down landscape fabric to help with weed control.
- Install the Border: Place the bricks on their sides in a circular pattern to create a simple, defined edge.
- Lay the Pavers: Lay the main patio bricks in the desired herringbone pattern, tapping them into the sand with a rubber mallet to ensure they are level.
- Fill the Joints: Sweep sand over the patio surface to fill the gaps between the bricks.
- Add Furniture: Place your furniture set in the center of the finished patio.
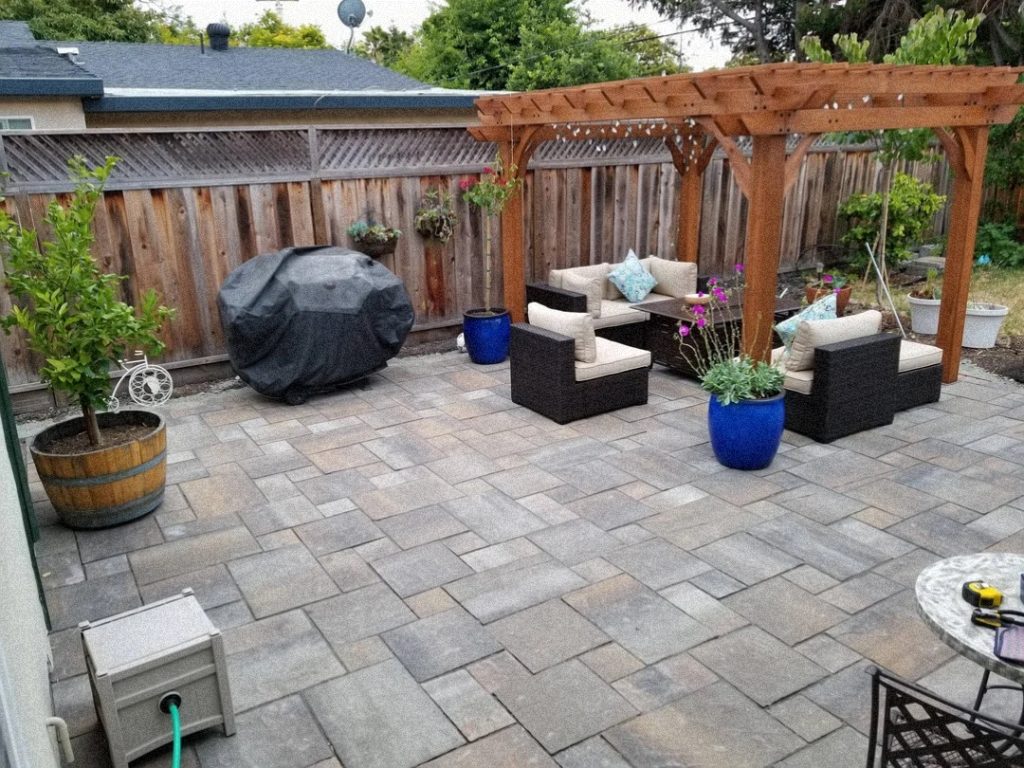
Image: https://www.reddit.com/user/donut_care/
4. The All-in-One Patio
What Makes It Unique
Instead of creating separate zones for cooking and relaxing, this design integrates them into one cohesive space. The pergola provides shade and a sense of enclosure for the seating area, while leaving the grilling station open and accessible. This layout is perfect for small to medium-sized backyards where you want to make the most of every square foot without feeling cramped.
Materials Needed
- Patio pavers
- Pergola kit
- Outdoor furniture
- Grill
- Planters
- Lighting
How to Do It
- Prepare the Area: Start by marking out the shape of your patio. Dig up the grass and level the ground, making sure there is a slight slope away from your house for drainage.
- Lay the Foundation: Add a layer of gravel and sand. This provides a stable base for your pavers and helps with drainage.
- Install the Pavers: Lay the pavers in your chosen pattern. Use a rubber mallet to tap them into place and a level to ensure they are flat.
- Install the Pergola: Follow the instructions for your pergola kit to assemble and secure it. It’s best to do this before placing your furniture.
- Place Furniture and Accessories: Arrange your outdoor furniture and place your grill, planters, and other accessories.
Image: https://www.instagram.com/lovely.harbor/
5. The Urban Oasis Patio
What Makes It Unique
This design is a masterclass in maximizing a small or confined space. Instead of seeing the walls as a limitation, they’re used to create a sense of enclosure and privacy. The strategic use of ambient string lights and a lush collection of potted plants gives the feeling of a vibrant, open garden, while a comfortable sectional sofa and area rug make the space feel like a true extension of the home’s interior. This design creates a cozy, intimate atmosphere that is perfect for urban settings.
Materials Needed
- Sectional sofa or outdoor seating
- Outdoor coffee table
- Cushions and throw pillows
- Outdoor area rug
- Potted plants of various sizes
- Planters
- String lights
- Small lanterns or lamps
- Wall-mounted decor (e.g., hanging lantern)
- Pavers or flooring material
How to Do It
- Define the Space: Start by ensuring the floor is level. You can use pavers, gravel, or another material to create a clean, even surface.
- Add Seating: Place your sectional sofa to make the most of the available space, creating a natural conversation area.
- Create a Green Wall: Arrange potted plants along the perimeter walls to bring life and a sense of nature into the space. Use a variety of plant sizes and heights to add visual depth.
- Install Lighting: Hang string lights across the ceiling or along the walls. This creates a soft, warm glow that makes the space inviting in the evening. Add lanterns on the floor or tables for extra light.
- Add Final Touches: Lay down an outdoor rug under the coffee table and sofa to anchor the seating area. Arrange throw pillows and decorative items to complete the look.
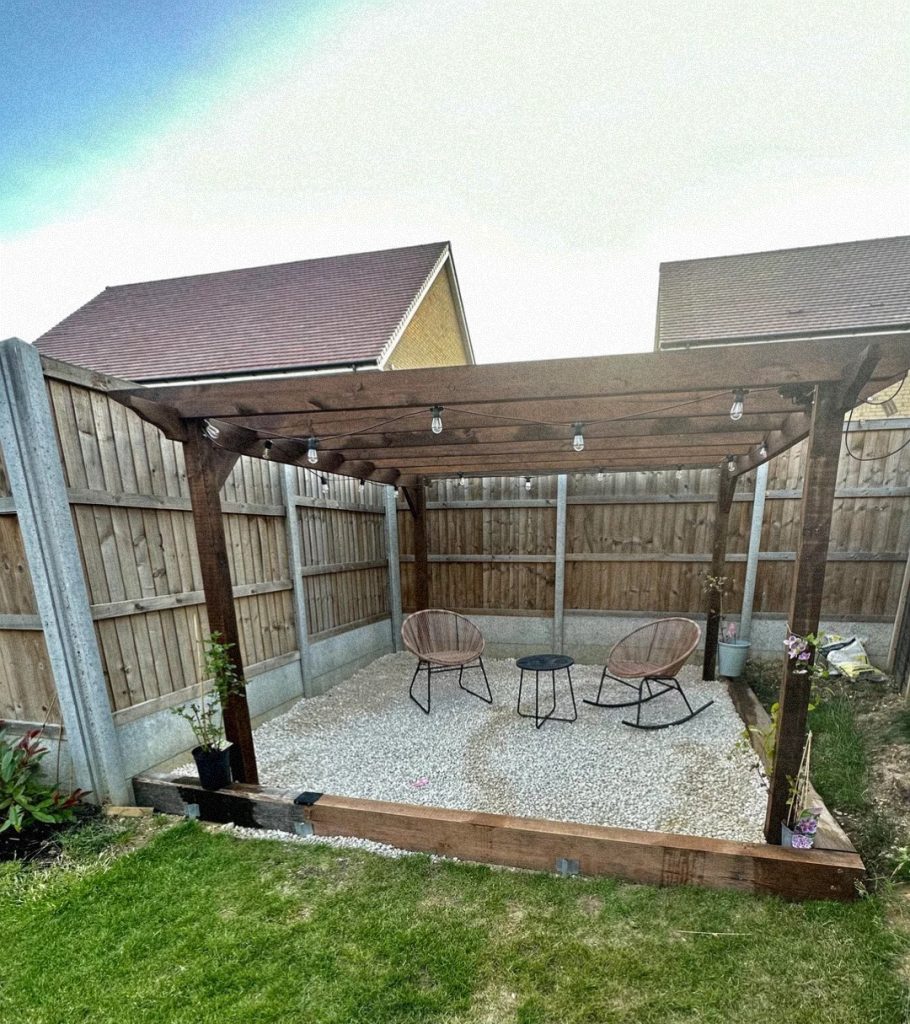
Image: https://www.reddit.com/user/bicepofelokobi/
6. The Minimalist Gravel Pergola
What Makes It Unique
This patio’s highly contained, geometric structure utilizes a large wooden railway sleeper border to separate the gravel patio sharply from the surrounding lawn. The design is minimalist and functional, focusing only on shelter and seating. The contrast between the dark, stained wood of the pergola and the bright, light-colored gravel surface provides a modern, high-contrast aesthetic that is both budget-friendly and easy to maintain.
Materials Needed
- Lumber for the pergola frame (posts, beams, rafters)
- Large wooden sleepers or timbers (for the border)
- Gravel (for the patio surface)
- Landscaping fabric
- String lights
- Outdoor seating (chairs and side table)
- Potted plants (optional)
How to Do It
- Mark and Excavate: Define the area for the patio. Dig down into the space within the perimeter to create a shallow, level base for the gravel.
- Install the Border: Position and secure the large wooden sleepers or timbers around the perimeter to create a raised, defined border for the patio area.
- Install the Pergola: Dig post holes deep enough to secure the pergola posts. Set the posts and construct the rest of the pergola frame (beams and rafters), ensuring it is stable and level.
- Lay the Base: Lay down landscaping fabric inside the framed area to suppress weeds.
- Add Gravel: Pour the gravel inside the border. Use a rake to spread and level the gravel evenly across the landscaping fabric.
- Add Furnishings: Hang the string lights across the pergola beams. Place your seating and small side table to complete the space.
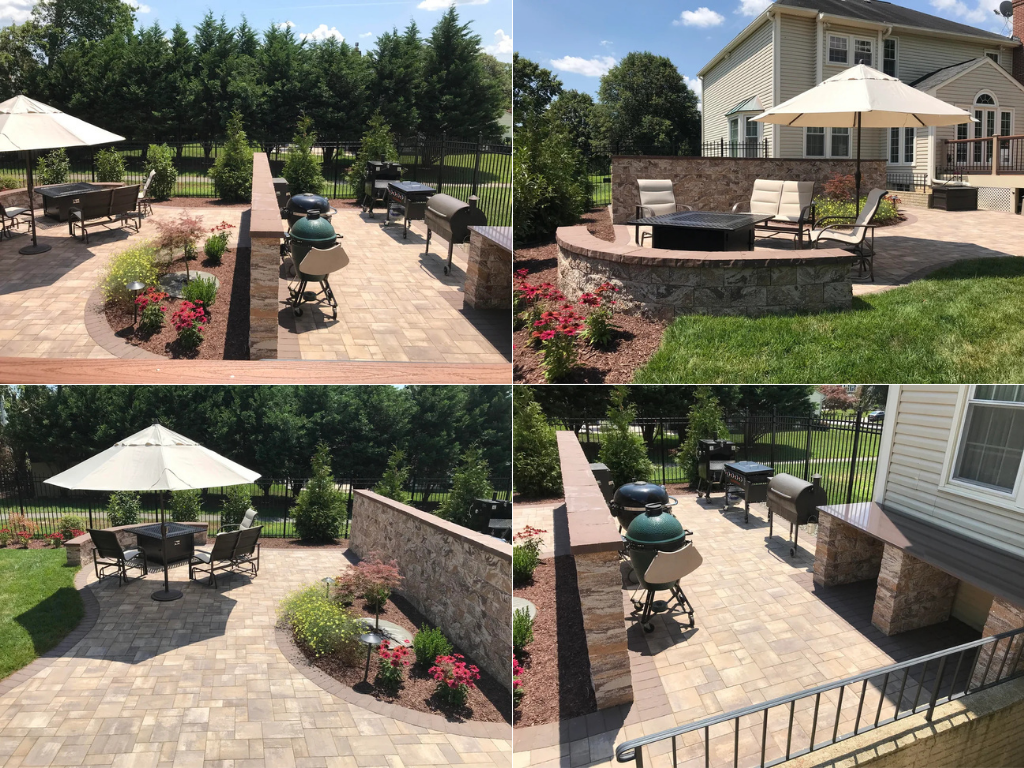
Image: https://www.reddit.com/user/ShakeThatAsclepias/
7. The Ultimate Outdoor Kitchen and Entertainment Hub
What Makes It Unique
This patio is a true destination, not just a simple seating area. Its uniqueness lies in the multi-zoned layout, which seamlessly integrates a dedicated outdoor kitchen with a built-in fire pit and a separate dining area. The use of stone veneer walls and raised planters provides both privacy and a cohesive, high-end aesthetic. This design maximizes functionality and flow, allowing for large gatherings where guests can move easily between cooking, dining, and relaxing.
Materials Needed
- Pavers (various styles for different sections)
- Stone veneer and concrete blocks (for the fire pit and retaining walls)
- Lumber for the deck or patio edging
- Outdoor kitchen appliances (grills, smokers, side burners)
- Countertop material (e.g., stone, concrete)
- Outdoor dining set and umbrella
- Fire pit seating
- Landscape lighting
- Assorted plants and flowers for garden beds
How to Do It
- Design the Zones: Map out the placement of the grilling station, dining area, and fire pit lounge. Consider the flow of foot traffic and proximity to the house.
- Lay the Foundation: Prepare and level the ground for each section of the patio. Install a compacted base of gravel and sand for stability.
- Build the Structures: Construct the retaining walls and fire pit using concrete blocks and mortar, then apply the decorative stone veneer. Build any wooden deck sections or borders.
- Install the Pavers: Lay the patio pavers in your chosen pattern for each designated zone. Use a rubber mallet and a level to ensure they are flat and even.
- Set Up the Kitchen: Install the outdoor kitchen appliances and build the countertops around them. Connect any necessary gas or electrical lines.
- Add the Furniture and Lighting: Place the dining set, fire pit seating, and umbrella in their respective areas. Install landscape and string lighting to highlight features and make the space usable after dark.
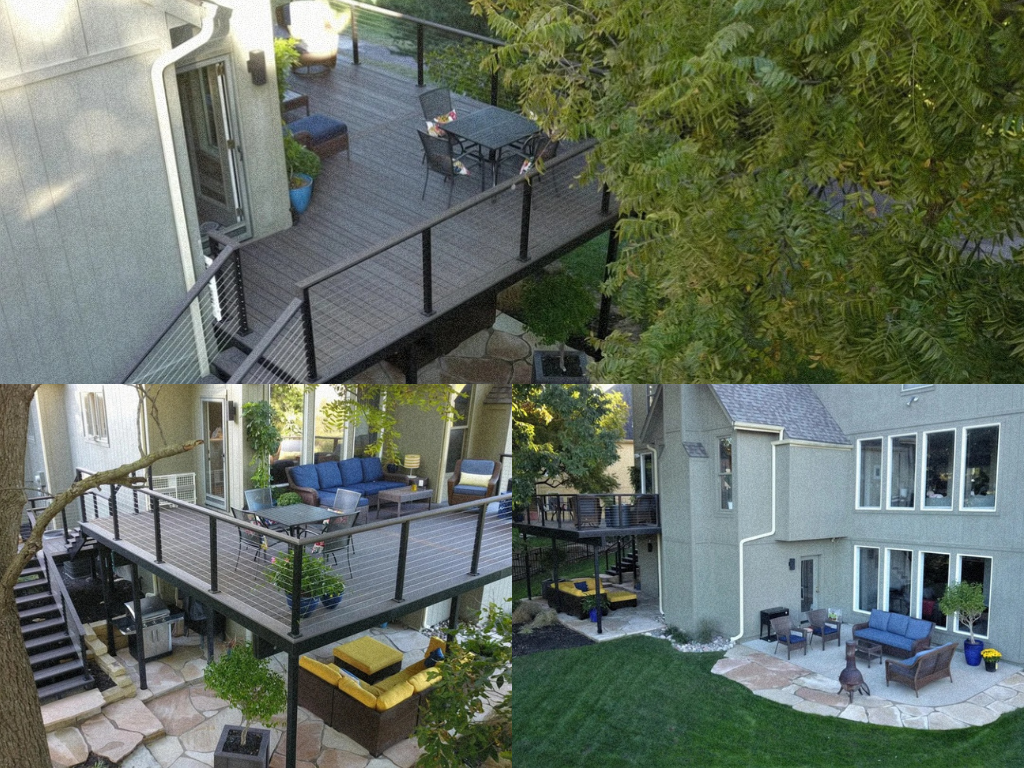
Image: https://www.reddit.com/user/CairnsSean/
8. The Multi-Level Entertainment Deck
What Makes It Unique
This patio’s design creates a series of connected “rooms” that serve different purposes: a main upper deck for dining and entertaining, and a lower-level patio for a more intimate, casual lounge. The cable railing adds a sleek, modern touch that keeps the views open. This approach maximizes the usable square footage of the backyard while providing a sense of scale and visual interest.
Materials Needed
- Composite or wood decking
- Metal posts and frame
- Cable railing system
- Stone pavers or flagstone (for the lower patio)
- Outdoor furniture (dining set, sectional sofa)
- Gas grill
- Planters
- Outdoor lighting
How to Do It
- Plan the Structure: Work with a designer or engineer to create a blueprint for the multi-level deck, ensuring the design is safe and properly supported for your specific yard.
- Build the Frame: Construct the metal or wood frame for both the upper and lower deck levels. Secure all posts and beams into the ground and against the house according to the plan.
- Install the Decking and Railing: Lay the decking material on the upper level. Install the cable railing system around the perimeter of the deck and down the stairs, making sure all connections are secure.
- Create the Lower Patio: On the ground level, prepare the area by leveling the soil and laying a compacted base of gravel. Place the flagstone or stone pavers to create the lower patio floor.
- Add the Furnishings and Appliances: Arrange your outdoor furniture on both levels to create distinct zones. Set up your grill on the lower level. Add planters and lighting to complete the look.
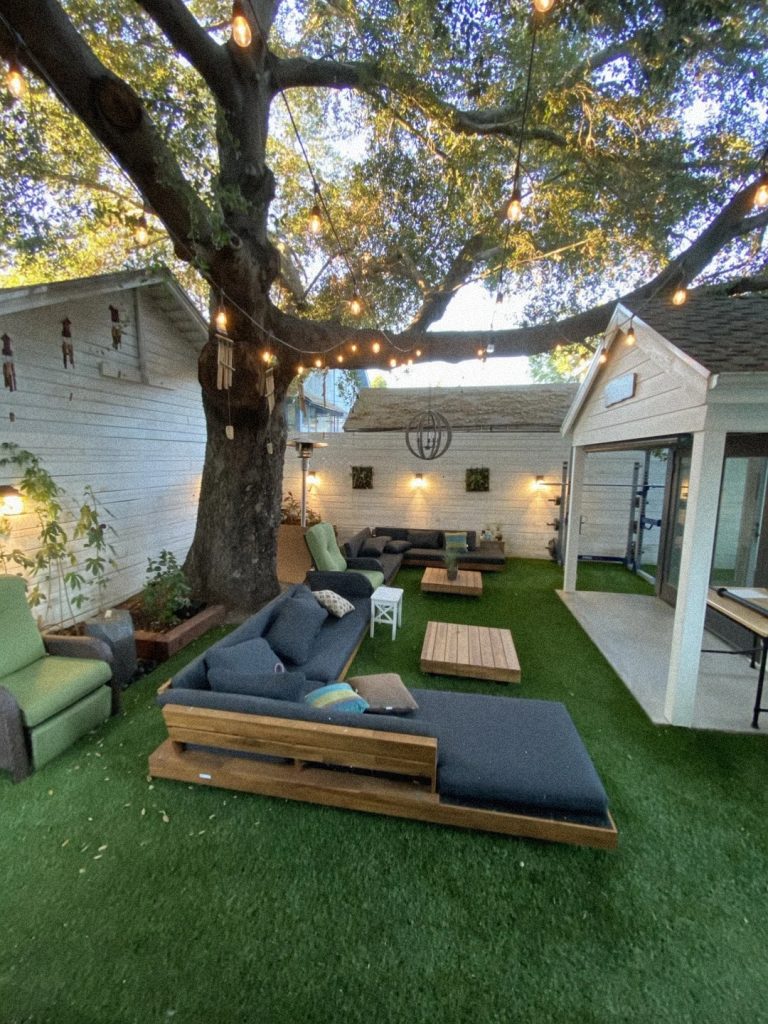
Image: https://www.reddit.com/user/MyNameGifOreilly/
9. The Open-Concept Lawn Patio
What Makes It Unique
This patio forgoes traditional hardscaping in favor of a soft, lawn-based surface, which provides a relaxed, barefoot-friendly feel. The layout is open-concept, with two separate but connected seating zones that allow for different activities or groups. The large, mature tree is used as a natural canopy, with bistro lights strung from its branches to create a magical, illuminated ceiling for the entire space. This design is perfect for maximizing an open, grassy area without the cost and permanence of traditional pavers or a deck.
Materials Needed
- Outdoor furniture (modular sectional sofa, chairs, coffee tables, side tables)
- String lights
- Outdoor lanterns or floor lamps
- Wall-mounted lighting fixtures
- Outdoor pillows and cushions
- Landscaping for garden beds (e.g., plants, planters)
- Turf or grass (if not already present)
How to Do It
- Prepare the Lawn: Ensure the lawn is level and well-maintained. If you’re using artificial turf, install it over a leveled, compacted base.
- Add Lighting: Install wall-mounted lights on the surrounding structures. Hang string lights from any existing trees or tall structures to create an overhead light canopy.
- Place Furniture: Arrange your furniture in separate zones to create distinct areas for lounging and conversation. Use a large modular sectional to define the primary seating space.
- Incorporate Plants: Place planters or create small garden beds along the edges of the space to add a natural feel and extra visual interest.
- Add Final Touches: Place outdoor pillows on the seating and arrange floor lanterns or other light sources to complete the cozy, well-lit atmosphere.
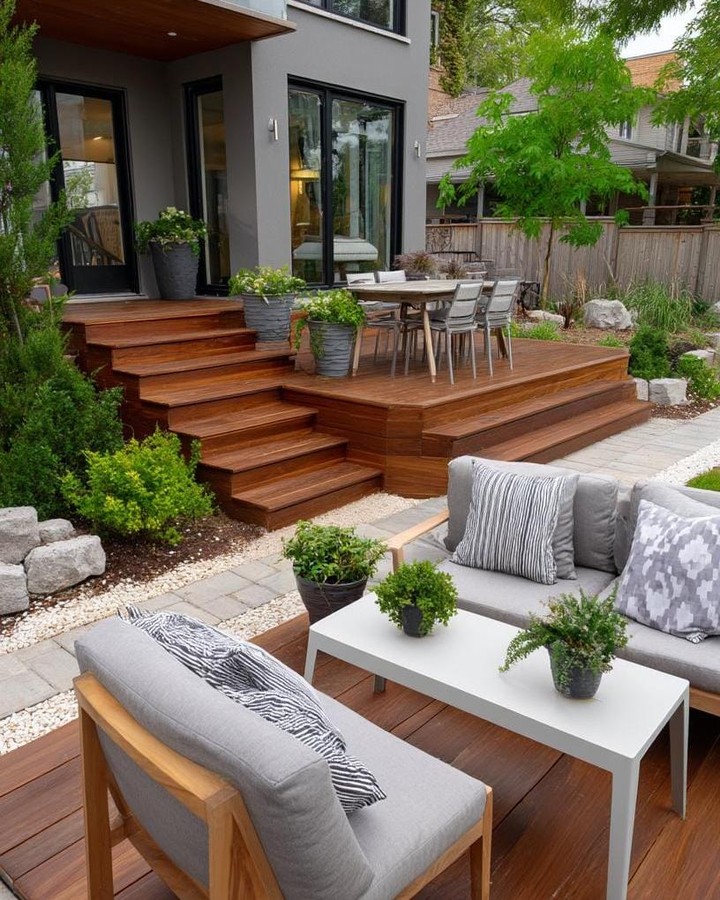
Image: https://www.instagram.com/lovely.harbor/
10. The Tiered Deck and Patio
What Makes It Unique
The most unique feature here is the cascading, tiered steps that double as a design element and a functional walkway. This approach breaks up a steep grade and offers multiple access points to the lower patio. The design also expertly separates function without visual barriers, using a mix of wood decking, stone pavers, and small river rocks to create distinct zones for dining and relaxed conversation. This layered look makes a compact backyard feel larger and more intentional.
Materials Needed
- Wood decking or composite boards (for the stairs and upper patio)
- Concrete pavers
- Gravel or small river rocks
- Outdoor dining set
- Outdoor lounge furniture
- Planters and assorted plants
- Edging material
How to Do It
- Design the Layout: Plan the placement and size of the upper and lower deck areas, as well as the connecting steps. Mark the design with stakes and string.
- Build the Structure: Construct the deck and stairs. Ensure the foundational framing is secure and the steps are wide and safe.
- Lay the Hardscaping: Install the pavers and gravel on the lower patio area. Use edging to separate the different textures and contain the gravel.
- Add Plants and Decor: Place planters on the steps and around the patio to soften the hard edges.
- Furnish the Space: Arrange the dining set on the upper deck and the lounge furniture on the lower patio to create two distinct social zones.