8 Sloped Backyard Landscaping Ideas That Work With Gravity
If you’ve ever tried setting a chair on your sloped backyard, you know the struggle. Everything slides, tips, or feels off-balance. But here’s the thing: gravity doesn’t have to be your enemy. With the right landscaping tricks, your hill can transform into a stunning multi-level retreat instead of a wasted patch of grass.
These 8 sloped backyard landscaping ideas will show you how to turn your sloped backyard into a breathtaking escape.
Sloped Backyard Landscaping Ideas
1. Terraced Garden Beds
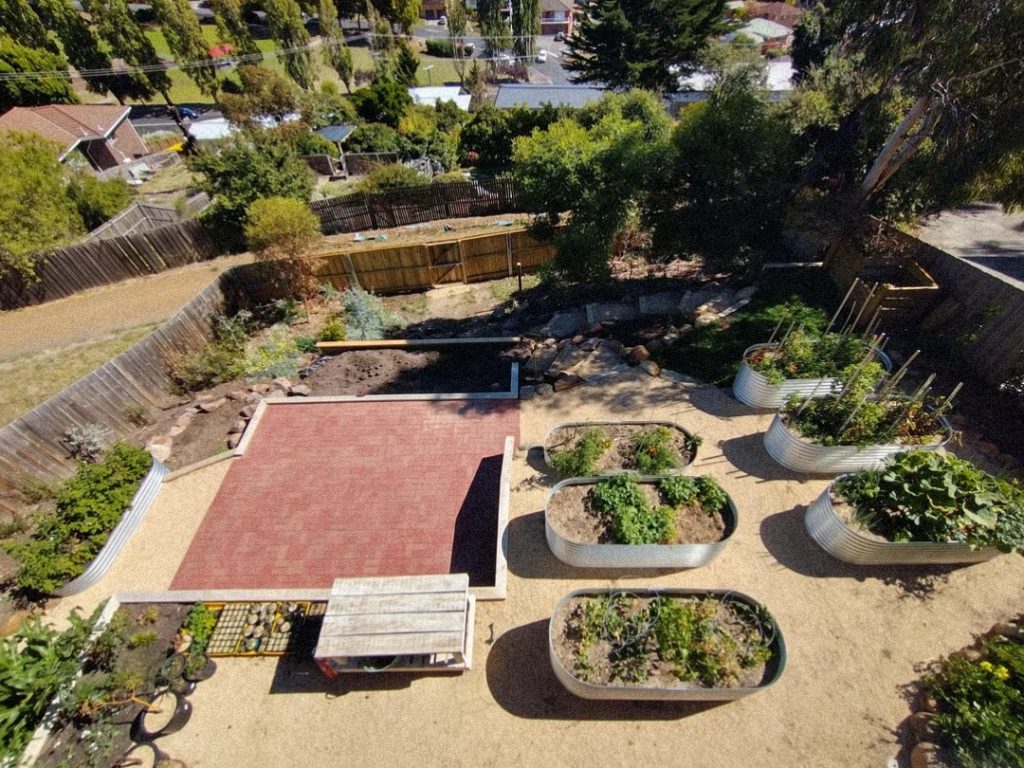
Image: https://www.reddit.com/user/swainsonaformosa/
What Makes It Unique
A terraced garden transforms a sloped backyard into a series of flat, usable spaces. This design not only prevents soil erosion but also makes gardening more accessible by creating defined, level areas for planting. It allows you to grow a wider variety of plants, from vegetables in raised beds to ornamental flowers and shrubs on different tiers.
Materials Needed
- Retaining wall materials (e.g., stacked stone, concrete blocks, wood timbers)
- Corrugated metal planters
- Landscaping fabric
- Fill dirt or topsoil
- Drainage gravel or pipe
- Gardening tools (shovels, rakes, wheelbarrows)
How to Do It
- Plan Your Layout: Determine the number and height of your terraces. A professional can help ensure the walls are properly engineered for stability, especially on steep slopes.
- Dig the Foundation: Start from the bottom of the slope and dig a trench for the base of your first retaining wall. The trench should be level and deep enough to provide a stable foundation.
- Build the Retaining Walls: Construct your retaining walls, ensuring each one is sturdy and level. For walls over a few feet tall, you’ll need to use a proper foundation and “deadman” anchors for reinforcement.
- Install Drainage: Place a layer of gravel or a perforated pipe behind each wall to allow water to drain away. This is critical for the longevity of the walls.
- Backfill the Terraces: Fill the newly enclosed areas with topsoil. You can lay landscaping fabric first to help with weed control.
- Add Plants and Features: Once your terraces are built and filled, you can install the raised beds, pathways, and plants. The level ground makes it easy to add garden beds, patios, or even a small lawn area.
2. Multi-Level Patio with Deck Tiles
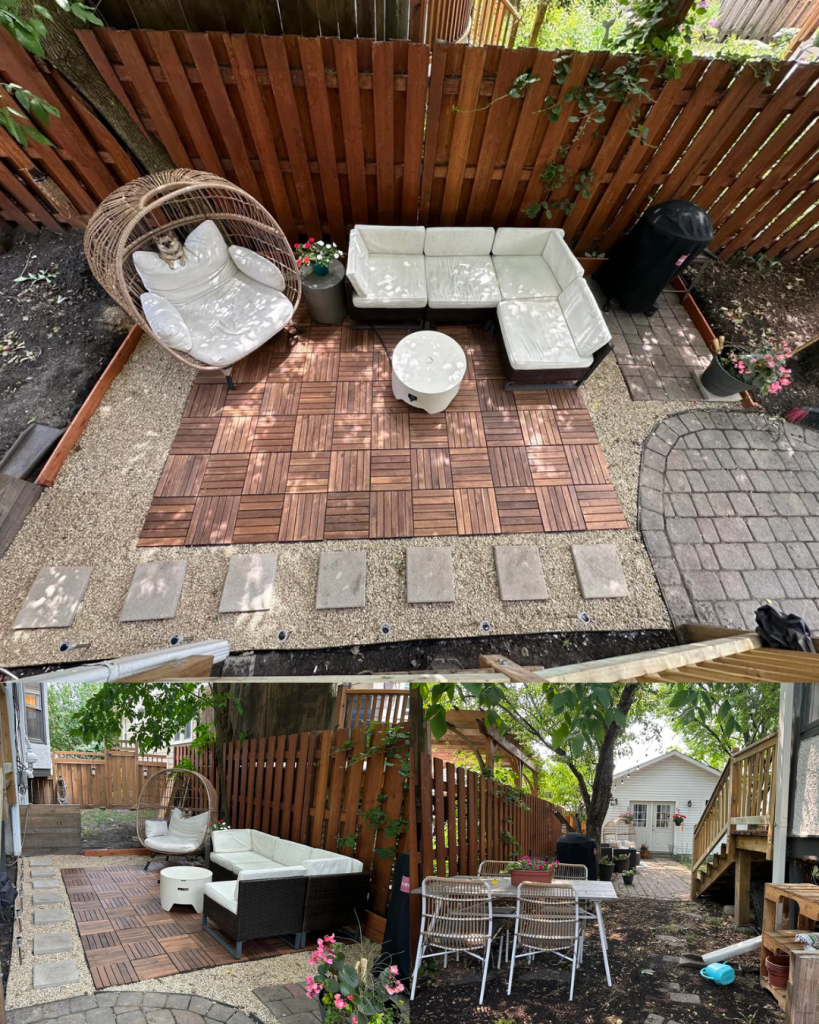
Image: https://www.reddit.com/user/bowie_nipples/
What Makes It Unique
This approach uses a combination of paver stones and modular deck tiles to create a distinct, multi-textured patio area. The use of different materials defines separate “zones” within the same space. The paver patio connects to the house, while the deck tile area creates a dedicated, comfortable spot for seating. This idea is particularly effective for small or narrow backyards, as it adds visual interest and functionality without the need for extensive construction.
Materials Needed
- Paver stones
- Modular wooden deck tiles
- Gravel or pebbles
- Weed barrier fabric
- Edging material
How to Do It
- Prepare the Area: Clear the area of any grass, roots, or debris. Dig out the space to the desired depth to allow for the base materials.
- Lay the Foundation: Install a weed barrier fabric across the entire area. Lay a base of gravel or sand and compact it to create a stable, level surface.
- Install the Paver Stones: Lay the paver stones to create your main patio or pathway, ensuring they are level and secure.
- Install the Deck Tiles: Snap the modular wooden deck tiles together to create the seating area. These are designed to be easy to install and can be arranged in various patterns.
- Add the Gravel: Fill the remaining spaces around the paver and deck tile sections with decorative gravel or pebbles to create a clean, finished look.
- Place Furniture and Decorations: Add outdoor furniture, potted plants, and other decor to complete your new, stylish outdoor living space.
3. Combined Terraced and Tiered Garden
Image: https://www.reddit.com/user/Basic_Profession8625/
What Makes It Unique
This approach uses a strategic combination of large-scale terracing and smaller, decorative tiers to create a dynamic landscape. You can use the solid retaining walls to create a level patio and a raised garden bed zone, while using the natural rocks and mulch to create softer, tiered planting beds on the remaining slope. This blend of materials creates a sophisticated, multi-textured look that is both highly functional and visually appealing.
Materials Needed
- Galvanized steel raised garden beds
- Paving stones or pavers for a patio area
- Gravel or crushed stone for pathways and ground cover
- Topsoil and compost for garden beds
- Wood or stone for retaining walls
- Landscaping rocks of various sizes
- Dark-colored mulch (e.g., shredded bark or wood chips)
- A variety of plants and flowers suitable for your climate
- Landscaping fabric or weed barrier
How to Do It
- Plan and Design: First, decide where you want the main level zones (like a patio or dining area) and where you want the tiered garden beds. This dual-purpose design requires a bit more planning to ensure the areas flow together seamlessly.
- Build the Retaining Walls and Patio: Construct the main retaining walls to create the primary level zones. Lay the patio pavers on a compacted base to form the first functional area, as seen in the first image.
- Create Tiered Beds With Rocks: For the remaining sloped areas, use natural landscaping rocks to create a series of small, tiered beds. Use the rocks to hold the soil and mulch in place, effectively preventing erosion.
- Install Landscaping Fabric: Lay down a weed barrier in the tiered beds to help with maintenance and prevent weeds from sprouting through the mulch.
- Add Plants and Mulch: Plant your chosen flowers, shrubs, and other greenery in both the raised beds and the tiered rock beds. Once planted, apply a thick layer of mulch to all garden areas for a clean look that helps retain moisture and suppress weeds.
4. Raised Garden Beds with Arches
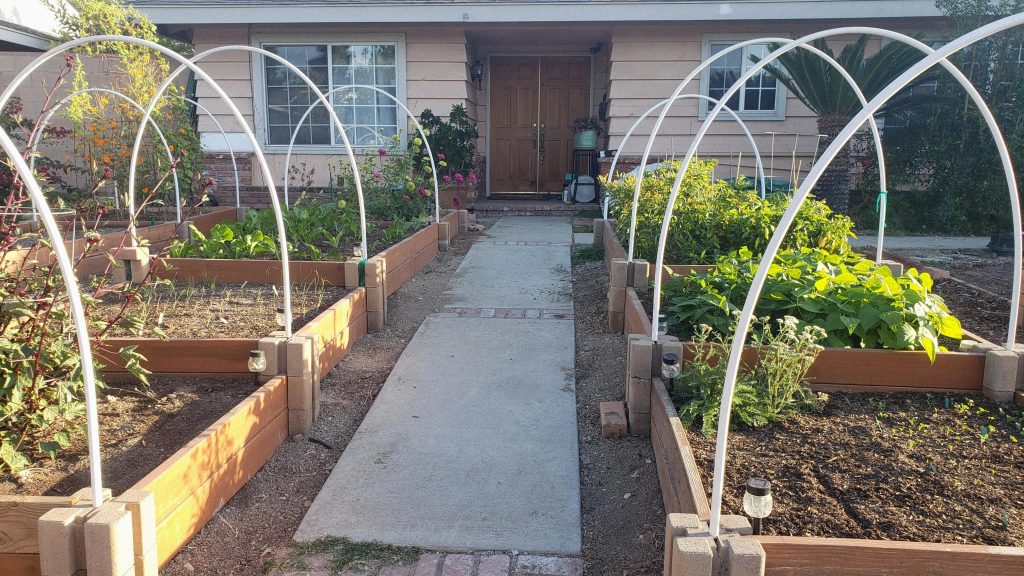
Image: https://www.reddit.com/user/souryellow310/
What Makes It Unique
This approach uses a series of raised garden beds to create a structured and highly productive growing space, even on a sloped yard. The defining feature is the addition of arches, which can be used to support climbing plants like beans or cucumbers, or for attaching protective coverings like shade cloth or frost barriers. This design is both practical and aesthetically pleasing. It provides a framework for vertical growth and a tidy, accessible garden plot.
Materials Needed
- Lumber (e.g., cedar, redwood, or pressure-treated wood)
- Concrete blocks or bricks
- Rebar or metal stakes (for securing the beds)
- PVC pipes or similar material for the arches
- Topsoil and compost
- Garden tools (shovel, wheelbarrow, rake)
How to Do It
- Level the Ground: Clear and level the ground where each raised bed will be placed. You can use a shovel and a carpenter’s level to ensure a flat base.
- Build and Secure the Beds: Construct the wooden beds and place them in the leveled areas. Use rebar or stakes to anchor them into the ground and prevent shifting.
- Install the Arches: Place concrete blocks at the corners of the beds. Secure the arches (made from PVC pipe or similar material) into the holes of the blocks, creating a tunnel-like structure over the beds.
- Fill and Plant: Fill the beds with a nutrient-rich mix of topsoil and compost. Once filled, you can plant your vegetables, flowers, or other plants, utilizing the arches for trellising or protection.
5. Terraced Lawn with Retaining Wall and Stairs
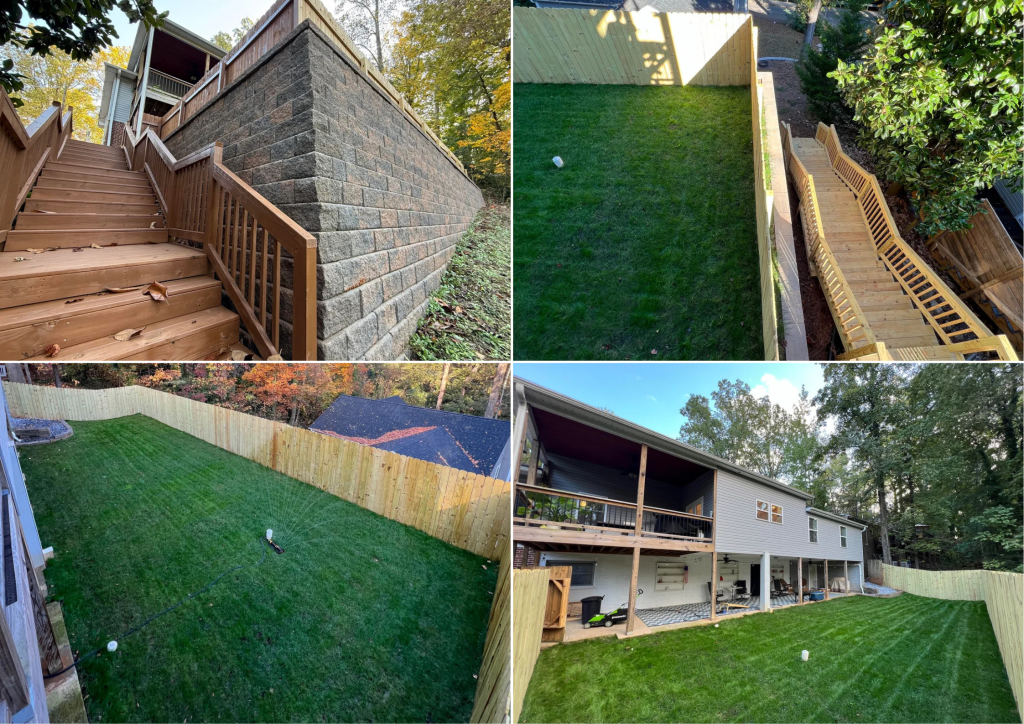
Image: https://www.reddit.com/user/iRipDabs/
What Makes It Unique
This is a comprehensive solution for a steep slope. Rather than trying to flatten the entire yard, this design uses a large, durable retaining wall to create a massive, flat, and usable lawn area. A significant wooden staircase is then added to connect the upper and lower levels, making the entire yard accessible. The result is a clean, modern, and highly functional outdoor space that can be used for recreation and entertaining.
Materials Needed
- Concrete blocks or similar materials for the retaining wall
- Gravel, fill dirt, and sand for the retaining wall foundation and backfill
- Wood timbers, deck boards, and railing kits for the stairs
- Grass seed or sod
- Landscaping fabric
- Outdoor lighting for the stairs (optional)
How to Do It
- Excavate the Slope: The most significant step is to excavate the hillside to prepare for the retaining wall. This creates the flat area for the new lawn.
- Build the Retaining Wall: Construct the retaining wall, ensuring it has a solid foundation and proper drainage to handle water runoff and soil pressure.
- Install the Stairs: Build the wooden staircase from the upper level down to the new lower lawn. This requires careful measurement and construction to ensure it’s safe and stable.
- Level and Prepare the Lawn: Once the hardscaping is complete, fill the new, terraced area with topsoil and level it out.
- Plant the Grass: Lay sod or spread grass seed and water according to instructions. This is the final step in creating the large, usable lawn area.
6. Combine Multi-Level Garden Beds with Pathways
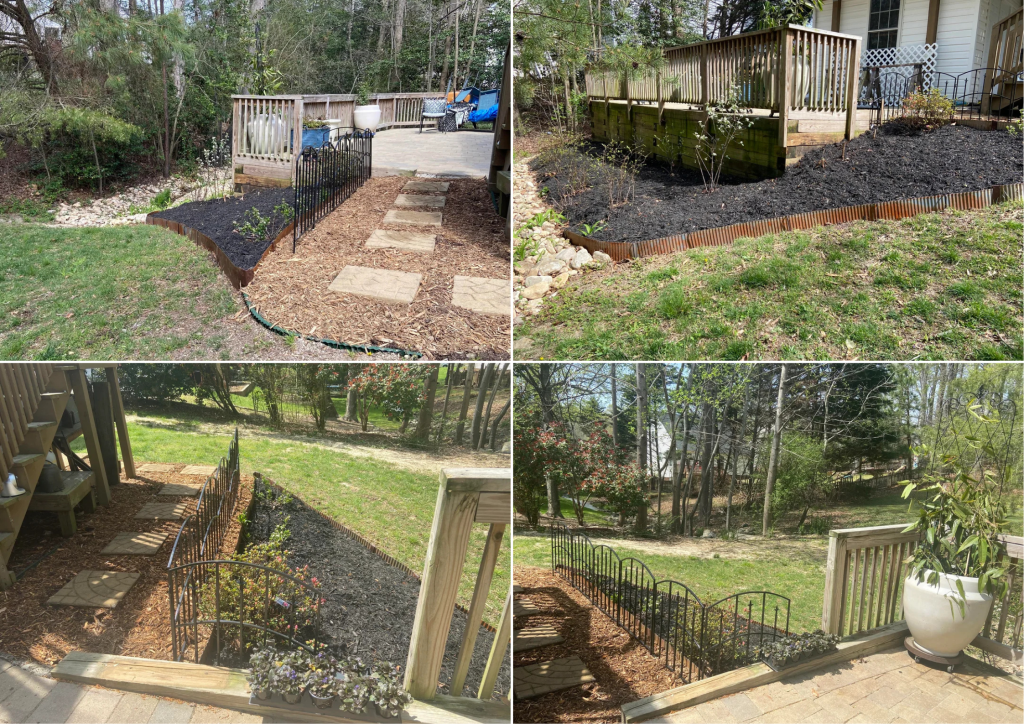
Image: https://www.reddit.com/user/Bawonga/
What Makes It Unique
This approach tackles a sloped yard by blending different materials to create a functional and visually appealing multi-level garden. It combines a durable corrugated metal border with a decorative low fence and a paver patio. This mix of materials breaks up the slope into manageable sections, prevents soil erosion, and adds textural variety. The design provides a pathway from the house down to the garden beds, ensuring the space is both accessible and beautiful.
Materials Needed
- Corrugated metal edging or similar material
- Decorative low fence (e.g., wrought iron or a simple picket fence)
- Paver stones or stepping stones
- Mulch (e.g., wood chips or shredded bark)
- Topsoil
- Landscaping fabric or weed barrier
How to Do It
- Define the Levels: Start by outlining the different garden beds and pathways. Use the corrugated metal edging to create the first level, following the natural curve of the slope.
- Add Pathways and Steps: Install a pathway from the deck or patio to the garden beds. This can be done with stepping stones or pavers on a bed of gravel or mulch.
- Install Fencing: Place the decorative low fence along the edge of the second level to create a physical and visual barrier, adding a touch of elegance.
- Fill and Plant: Fill the defined areas with topsoil and a thick layer of mulch. Then, plant your desired flowers, shrubs, or other plants. The mulch will help retain moisture and suppress weeds.
- Connect the Spaces: Ensure that the different levels and materials flow together naturally, creating a cohesive and inviting landscape.
7. Tiered Planters with Modular Metal Edging
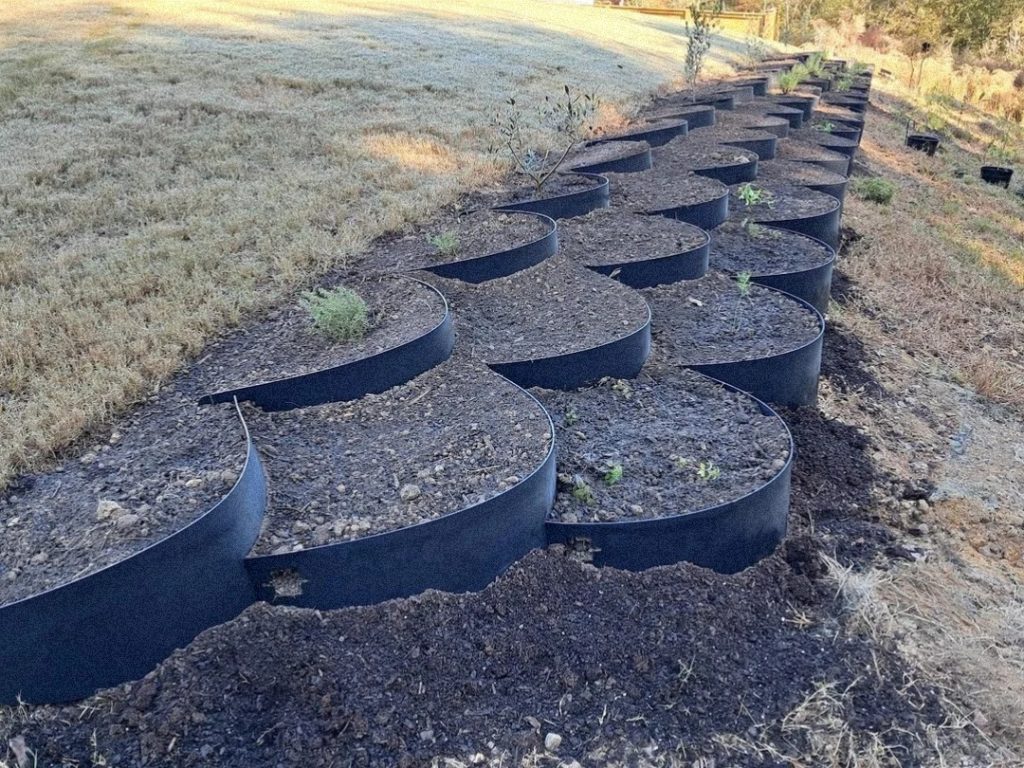
Image: reddit.com
What Makes It Unique
This method uses a series of tiered, crescent-shaped planters to create a stunning and functional statement on a gradual slope. The design uses strong, flexible metal edging to create individual, raised planting beds that follow the contour of the land. This approach is ideal for managing erosion on a hillside while creating a highly organized space for a variety of plants. The repeating, curved shapes add a sense of movement and artistry to the landscape.
Materials Needed
- Flexible metal landscape edging or steel sheets
- Topsoil
- Compost
- Small plants or shrubs
- Gardening tools (shovels, rake)
How to Do It
- Layout the Design: Use stakes or a string to mark the crescent shapes on the slope, ensuring each tier is slightly below the one above it.
- Install the Edging: Dig a shallow trench along the marked lines. Place the flexible metal edging into the trench and use stakes or rebar to secure it, creating the planter walls.
- Fill the Planters: Fill each crescent with a mix of topsoil and compost, leveling the soil inside each planter.
- Plant and Water: Plant your desired greenery within each bed, making sure to choose plants that are well-suited to the amount of sunlight the area receives.
8. Multi-Level Recreation and Leisure Area
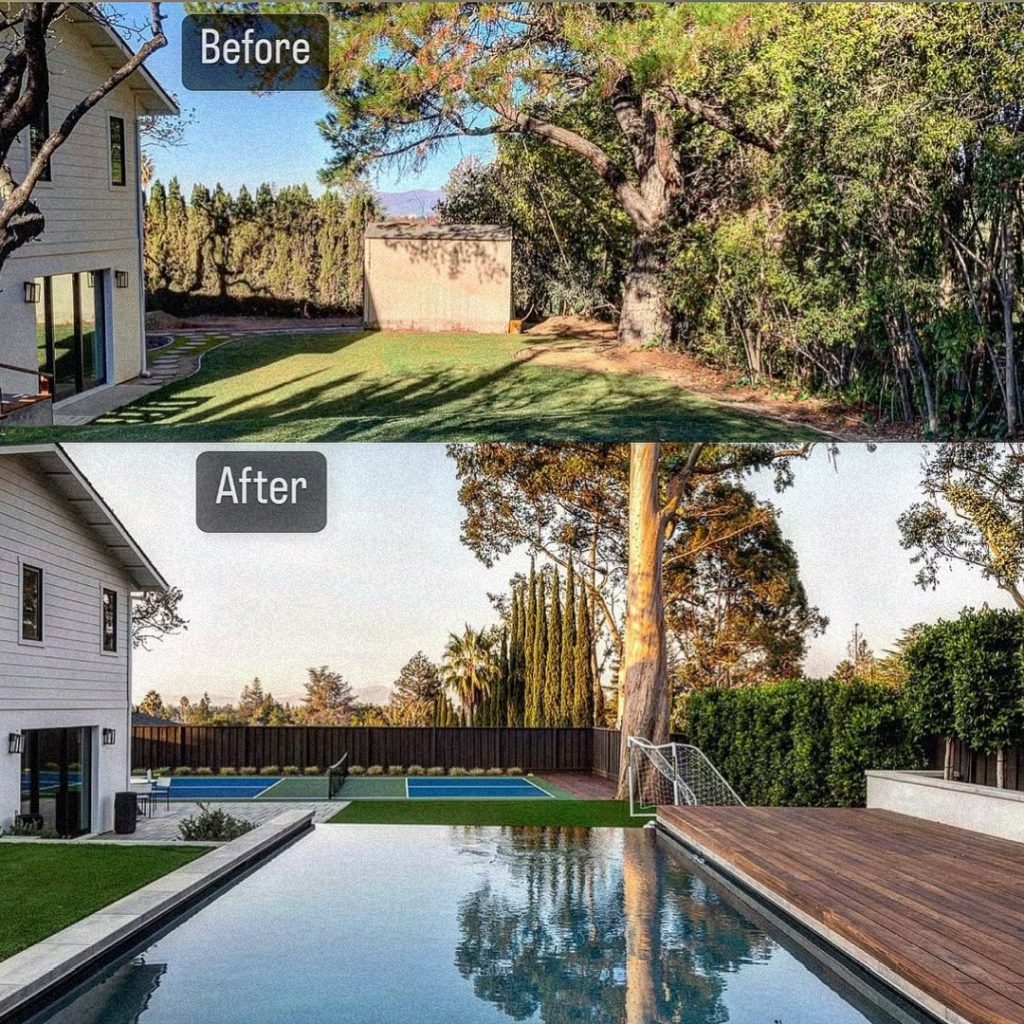
Image: https://www.instagram.com/we_landscapedesign/
What Makes It Unique
This landscaping idea addresses a steep slope by creating two distinct zones. The level area connected by a series of steps and landings. The upper area features a sophisticated hardscape patio and a small sports court, while the lower level is dedicated to a geometric pool and a surrounding deck. This design not only solves the issue of a sloped yard but also creates a dramatic, resort-like feel. The integration of modern materials like clean concrete pavers, wood decking, and lush green lawn makes for a high-end and highly functional.
Materials Needed
- Concrete pavers or poured concrete for retaining walls and walkways
- Wood decking planks and framing
- Artificial turf or sod
- Fencing materials for a clean-lined barrier
- Pool and sports court construction materials
How to Do It
- Survey and Plan: A project of this scale requires a professional landscape architect or contractor. The first step is to survey the slope and create a detailed plan, including grading and drainage.
- Excavate and Build the Foundation: The slope must be properly excavated to create the level pads for the pool, sports court, and other structures. Retaining walls and a stable sub-base are essential.
- Install the Sports Court and Pool: Construct the sports court and pool according to the design plan. This is a complex step that requires specialized skills.
- Install Hardscaping and Decking: Once the main structures are in place, lay the concrete pavers and build the wooden decks and stairs that connect the different levels.
- Finish With Softscaping: Install the turf or sod in the designated lawn areas. Add any final plantings and fencing to complete the look.