15 Trendy Summer Nail Ideas You Can Try This Season
Every year, I look for fresh inspiration to kick off the sunny season. But I hate spending hours searching for the perfect seasonal manicure style. Thankfully, modern summer nails have moved way past basic seasonal fads.
Finally, I have found nail designs for summer that transform into genuinely timeless classics designed for anyone to wear. From glowing beach gradients to ultra-clean pastel glazes, these stunning looks will effortlessly elevate your personal style anywhere.
Best Summer Nail Ideas
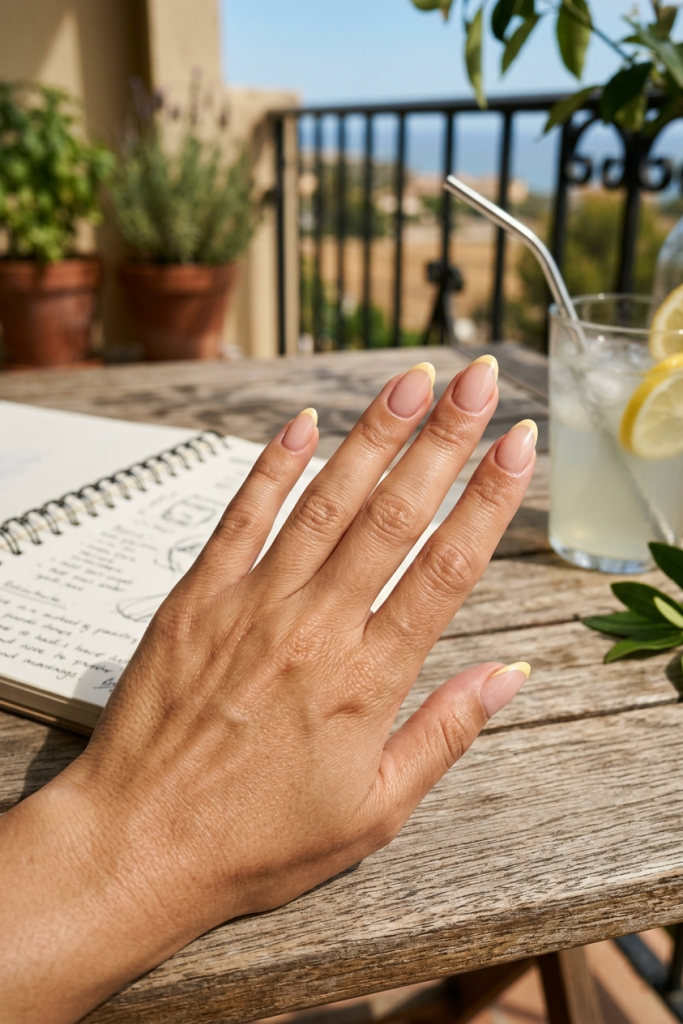
1. Juicy Citrus Summer Nails
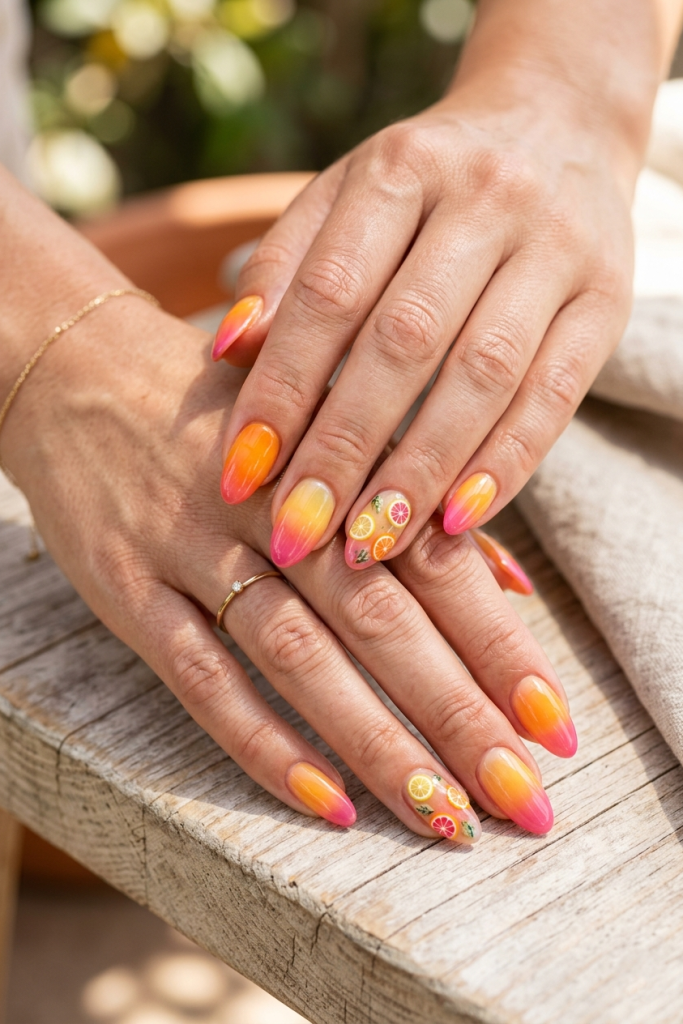
Why It’s Unique
Oh, look at this delicious tequila sunrise color blend. It completely reinvents the fruit trend by pairing juicy ombré shading with clear accent nails. The tiny embedded lemon and grapefruit slices look realistic enough to eat. It feels like a refreshing, happy hour drink for your fingertips.
How to Do It
- Prep the Base: Shape your nails and apply a clear protective bottom coat.
- Blend the Ombre: Sponge yellow and bright pink polish together for a gradient look.
- Keep One Clear: Leave your chosen accent nail completely translucent and bare.
- Place the Fruit: Stick tiny polymer clay citrus slices onto that clear base coat.
- Add Green Details: Paint miniature green leaves around the fruit using a fine brush.
- Lock It In: Apply a thick, glossy top coat to smooth out the slices.
2. Milky Glazed Ocean Blue Summer Nails
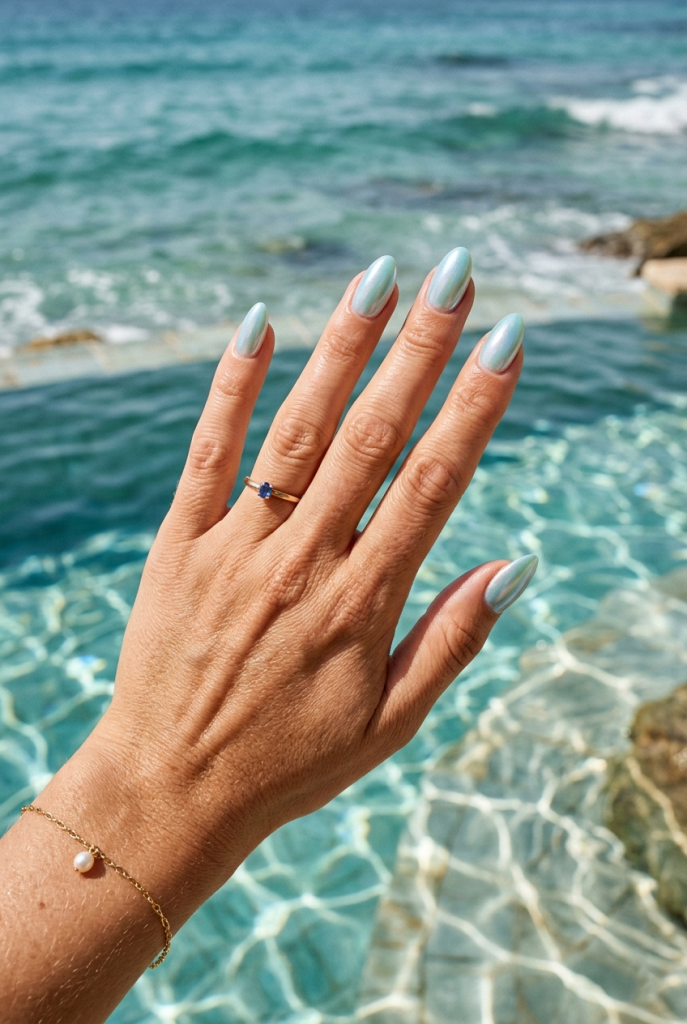
Why It’s Unique
I am totally giving into the mermaidcore fantasy with this ethereal look. This summer nail for the beach replaces basic flat blue with a milky, iridescent glaze that mimics sparkling water. The subtle pearlescent shimmer catches the sunlight beautifully at every angle. It looks like you dipped your hands straight into a tropical pool.
How to Do It
- Prep the Base: Shape your nails and apply a clear protective bottom coat.
- Paint the Color: Apply two thin coats of a milky, sheer pastel blue polish.
- Cure the Gel: Dry the layers thoroughly under a UV lamp if using gel.
- Apply the Glaze: Buff a fine pearlescent chrome powder directly onto the nail surface.
- Wipe Excess: Clean away the stray powder around your cuticles with a soft brush.
- Seal the Shimmer: Finish with a high-gloss top coat to lock in the shine.
3. Tropical Sunset Aura Nail Ideas
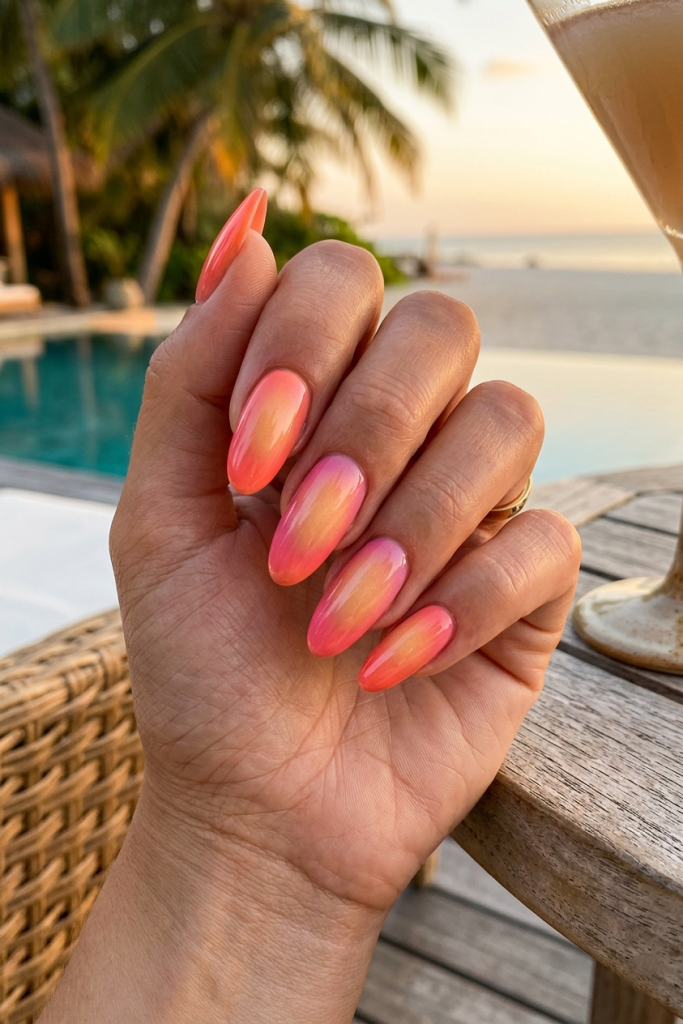
Why It’s Unique
Ready for a vacation? This design literally traps a Maldivian sunset right onto your nails. It updates the classic aura style by blending a warm, glowing yellow center into vivid tropical pink edges. The seamless transition makes your fingertips look electrified.
How to Do It
- Prep the Base: Shape your nails neatly and apply a clear protective bottom coat.
- Apply the Outer Color: Paint two layers of a bright neon pink or coral polish.
- Sponge the Center: Dab a warm yellow shade onto a makeup sponge for the center.
- Press the Aura: Gently tap the sponge on the middle to create a glowing circle.
- Blend the Edges: Soften the color borders using a clean brush or sponge edge.
- Lock the Glow: Finish with a high-gloss gel top coat for maximum beach radiance.
4. Butter Yellow Minimalist Summer Nails
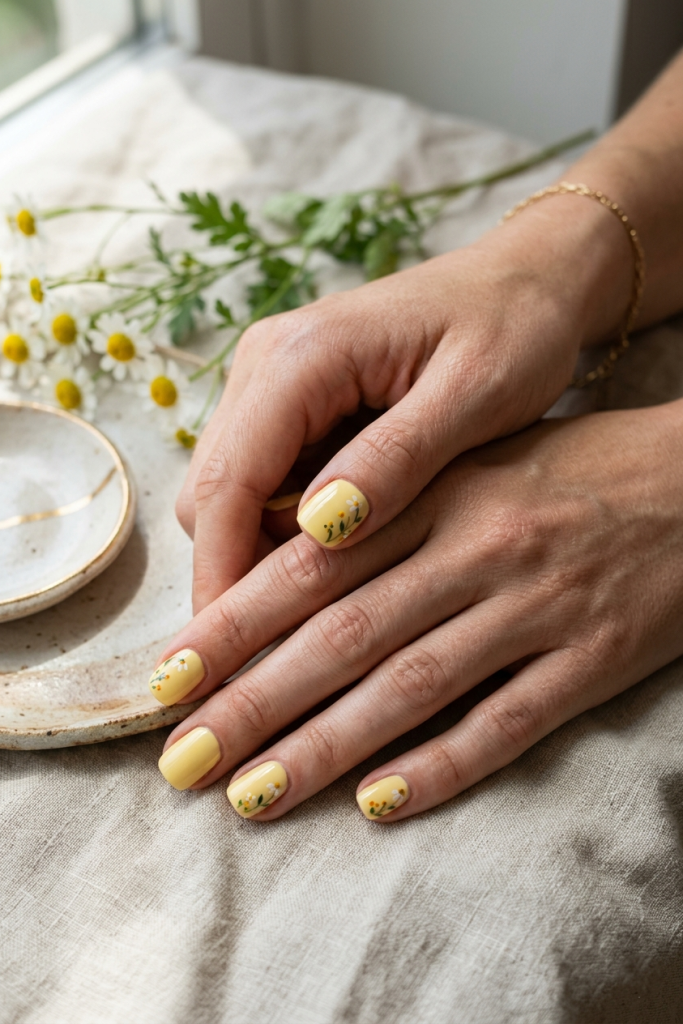
Why It’s Unique
I used to think yellow manicures looked too loud, but this creamy butter shade completely changed my mind. It leans heavily into the clean-girl aesthetic by pairing a soft, pastel base with dainty, hand-painted chamomile flowers. The ultra-fine green stems add a cottagecore touch that feels grounded and peaceful. It is a quiet luxury but makes it summer.
How to Do It
- Prep the Base: Shape your nails and apply a clear protective bottom coat.
- Paint the Color: Apply two smooth coats of a creamy, butter-yellow polish.
- Dot the Flowers: Use a dotting tool with white polish to create small petals.
- Add the Centers: Place a tiny mustard yellow dot in the middle of each flower.
- Draw the Stems: Trace ultra-thin green lines using a fine detail nail art brush.
- Seal and Shine: Finish with a high-gloss top coat to protect the design.
5. Mermaid Chrome Summer Nail Inspiration
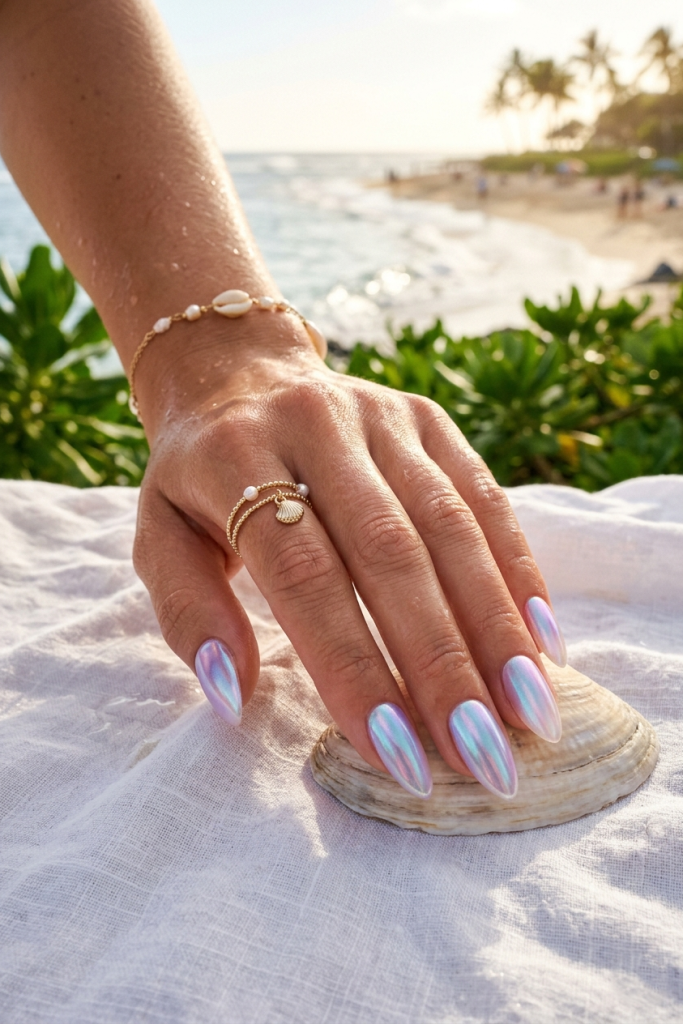
Why It’s Unique
Ever wanted to look like an actual mythical ocean creature? This sets aside basic glitter polishes for a high-shine, futuristic pearl finish. It shifts between cool aqua and soft lavender shades depending on how the bright sunlight hits it. To me, it feels less like a manicure and more like magic shell armor.
How to Do It
- Prep the Base: Shape your nails and apply a clear protective bottom coat.
- Paint the Color: Apply two coats of a soft, semi-sheer lavender-pink gel polish.
- Add Top Coat: Apply a no-wipe gel top coat and cure it completely.
- Buff the Chrome: Rub a neon iridescent mermaid chrome powder firmly onto the nail.
- Remove the Dust: Brush away any leftover powder flakes from your skin and cuticles.
- Seal the Shine: Lock everything in with another layer of glossy top coat.
6. Pink Hibiscus Summer Nails
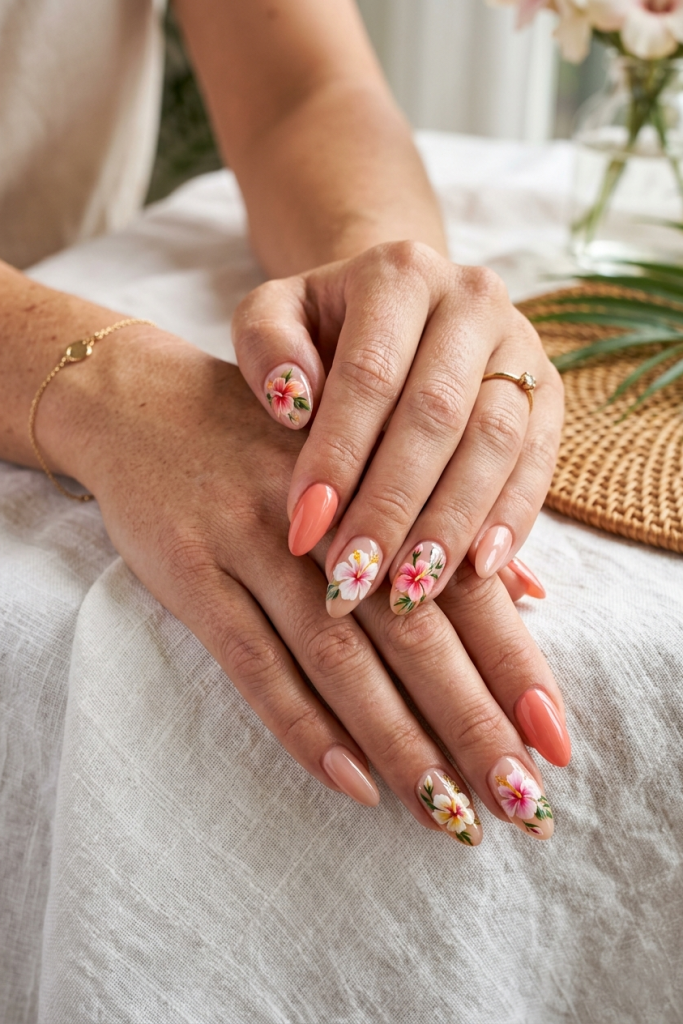
Why It’s Unique
This design swaps predictable summer neon for a soft tropical romance vibe. I love how it breaks the boring “one accent nail” rule. It mixes warm solid coral with gorgeous hand-painted hibiscus flowers. This look gives off major sophisticated island-hopping energy. Honestly, it looks more like wearable art than a standard salon trip.
How to Do It
- Prep the Canvas: Clean, shape, and apply a clear protective base coat.
- Layer the Solids: Paint selected accent nails with two coats of vibrant coral polish.
- Create the Sheer Base: Apply a translucent nude polish to the remaining nails.
- Paint the Petals: Use a fine detail brush and acrylic paint to sketch soft pink and white hibiscus petals.
- Detail the Centers: Add tiny yellow dots and delicate green leaves to bring the flowers to life.
- Seal and Shine: Finish with a glossy top coat to lock in the artwork.
7. Iced Lavender Chrome Nail Ideas
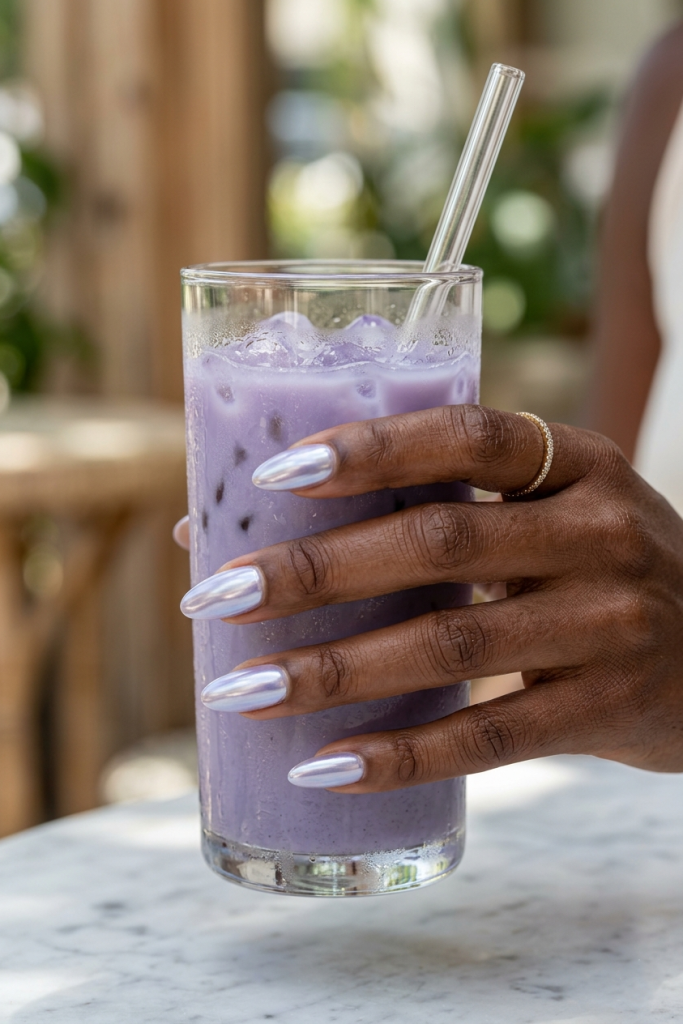
Why It’s Unique
This looks completely updated summer aesthetics by matching your nails directly to your favorite iced taro latte. It layers a crisp metallic glaze over a soothing, milky pastel purple base color. The frosty, ice-cold chrome finish adds an incredibly chic edge that instantly cools down a hot summer day.
How to Do It
- Prep the Base: Shape your nails neatly and apply a clear protective bottom coat.
- Paint the Color: Apply two coats of an iced lavender or pale purple polish.
- Add Gel Layer: Swipe a thin layer of no-wipe gel top coat and cure.
- Buff the Chrome: Rub a frosty white chrome powder firmly over the nail surface.
- Clean the Edges: Use a fluffy makeup brush to remove any stray metallic dust.
- Seal the Shine: Finish with a high-gloss top coat to lock in the frost.
8. Coastal White Shell Summer Nails
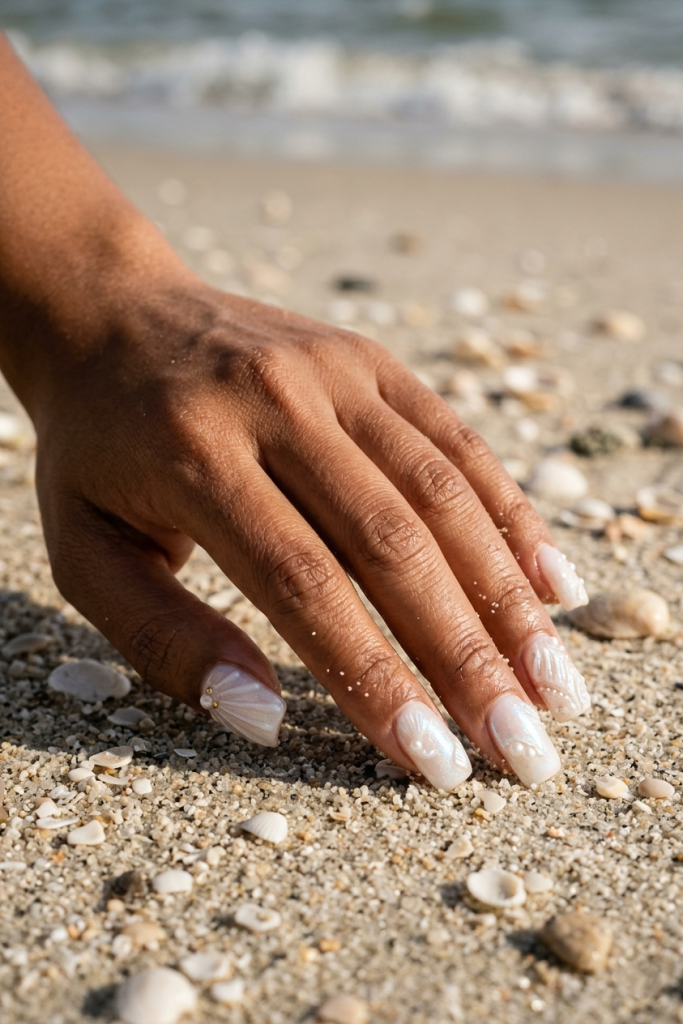
Why It’s Unique
I used to think textured nail art was way too high-maintenance for the beach. However, these 3D coastal white ridges completely changed my perspective on textured manicures. The design skips flat ocean blues to sculpt realistic, pearlescent ridges right onto your fingertips. Tiny embedded pearls make it feel like you discovered treasure along the shoreline.
How to Do It
- Prep the Base: Shape your nails and apply a clear protective bottom coat.
- Paint the Pearl: Swipe on two coats of a milky, iridescent white gel polish.
- Sculpt the Ridges: Draw raised lines using a thick, clear 3D builder gel.
- Cure the Texture: Dry the sculpted lines thoroughly under your UV LED lamp.
- Attach the Pearls: Place tiny nail pearls onto the base using strong nail glue.
- Seal and Protect: Apply a no-wipe gel top coat over the entire design.
9. Watermelon Summer Nail Art
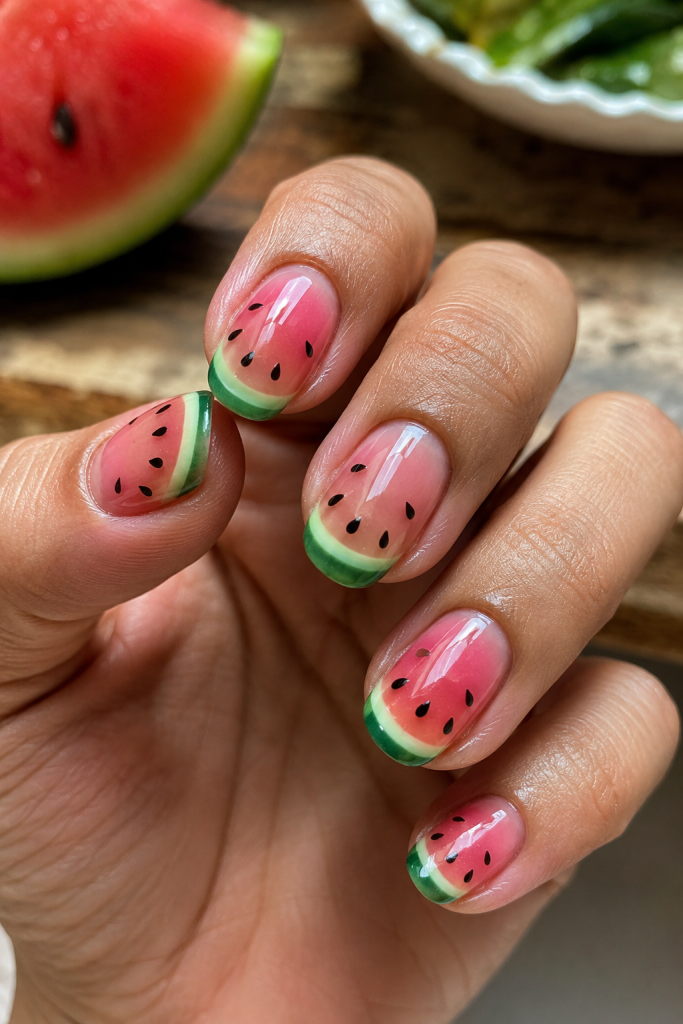
Why It’s Unique
Craving something sweet? Try this! The traditional watermelon trend shifts the focal point directly to your tips. It uses an incredibly clever French manicure layout to mimic juicy fruit slices on a sheer base. The jelly-like texture makes the pink centers look impossibly fresh and delicious.
How to Do It
- Prep the Base: Shape your nails and apply a clear protective bottom coat.
- Blush the Center: Sponge sheer pink jelly polish onto the middle of the nail.
- Paint the Rind: Trace a vibrant green line along your tips like a French manicure.
- Add the Detail: Line a thin swipe of white polish just beneath the green rind.
- Dot the Seeds: Use a fine detail brush to add tiny black seed teardrops.
- Seal the Juice: Finish with a thick, high-gloss top coat to maximize shine.
10. Peach Sorbet French Tip Summer Nails
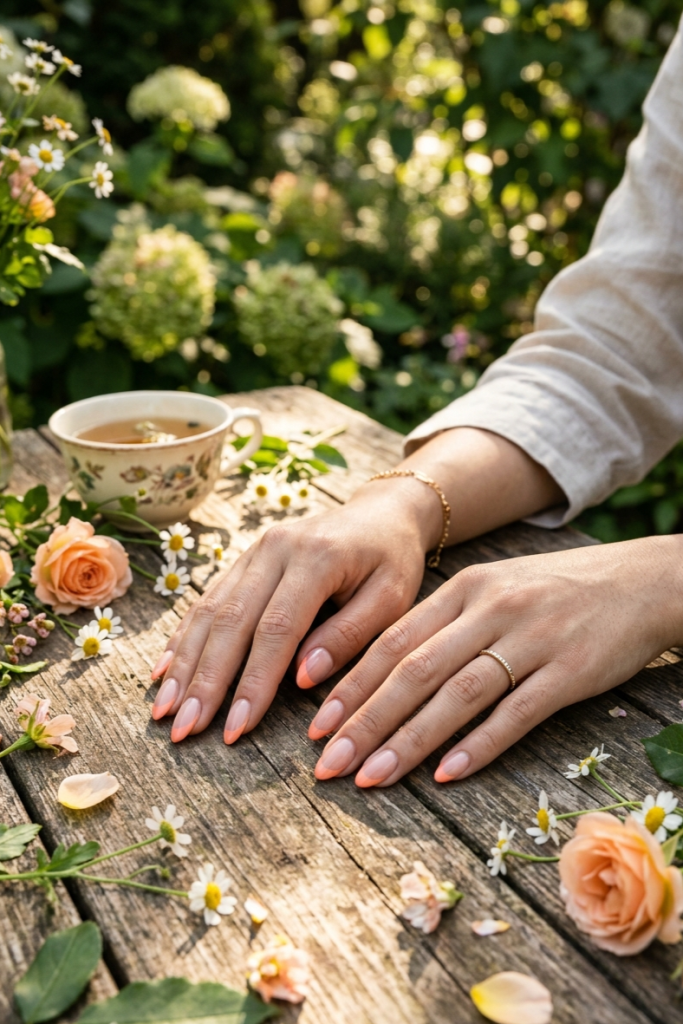
Why It’s Unique
Is there anything better than a chilled dessert on a sunny afternoon? This style swaps out boring white tips for a soft, creamy peach sorbet shade. It also looks clean and minimalist, but still brings the perfect amount of seasonal warmth. Your hands will instantly look ready for a garden tea party.
How to Do It
- Prep the Base: Shape your nails and apply a clear protective bottom coat.
- Paint the Nude: Coat your nails in a sheer, natural nude polish layer.
- Map the Tips: Use a fine liner brush to trace the French tip smile line.
- Fill with Peach: Paint the tips with a creamy, pastel peach sorbet shade.
- Clean the Lines: Crisp up any uneven edges using a brush dipped in acetone.
- Seal the Look: Apply a glossy top coat to lock in the clean finish.
11. Blue Lagoon Inspired Nails
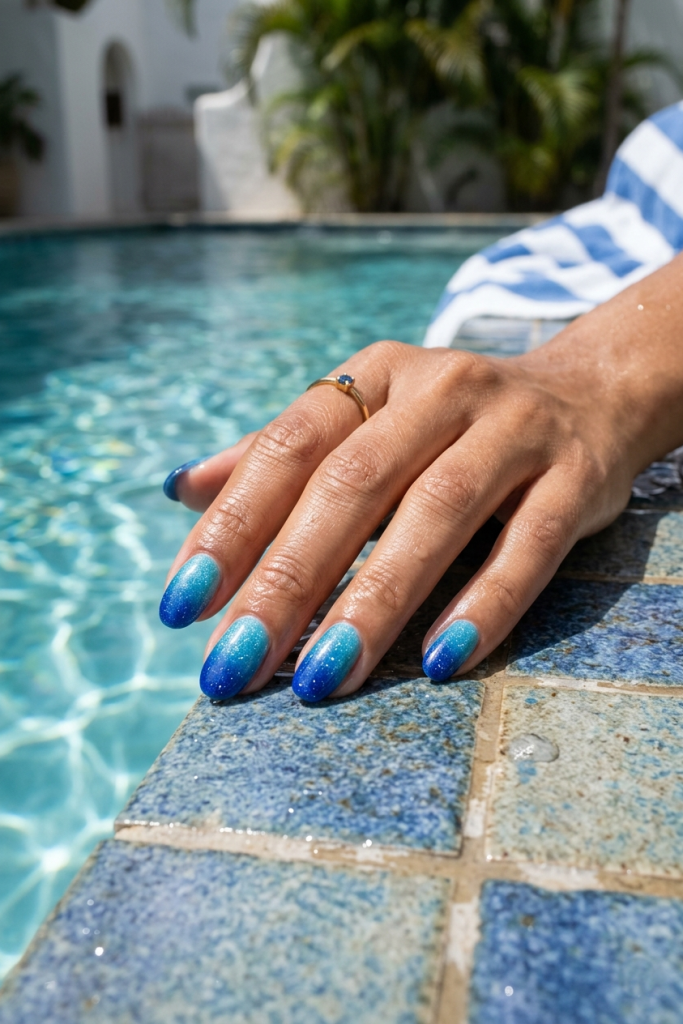
Why It’s Unique
It’s time to ditch the basic blue and wear a literal resort pool. Don’t you love this deep ocean gradient? It cleverly stacks a glittery turquoise base over dark royal blue tips to capture moving water. The subtle shimmer makes your nails look like sunlit ripples on a luxury holiday.
How to Do It
- Prep the Base: Shape your nails and apply a clear protective bottom coat.
- Paint the Light: Coat your entire nail using a bright, shimmery turquoise polish.
- Sponge the Dark: Dab deep royal blue polish onto a makeup sponge edge.
- Press the Gradient: Tap the sponge onto your tips to create a pool depth look.
- Blend the Transition: Soften the color borders using a clean brush for a smooth blend.
- Seal the Pool: Finish with a high-gloss top coat to maximize the watery shine.
12. Pearl Glazed Summer Nails
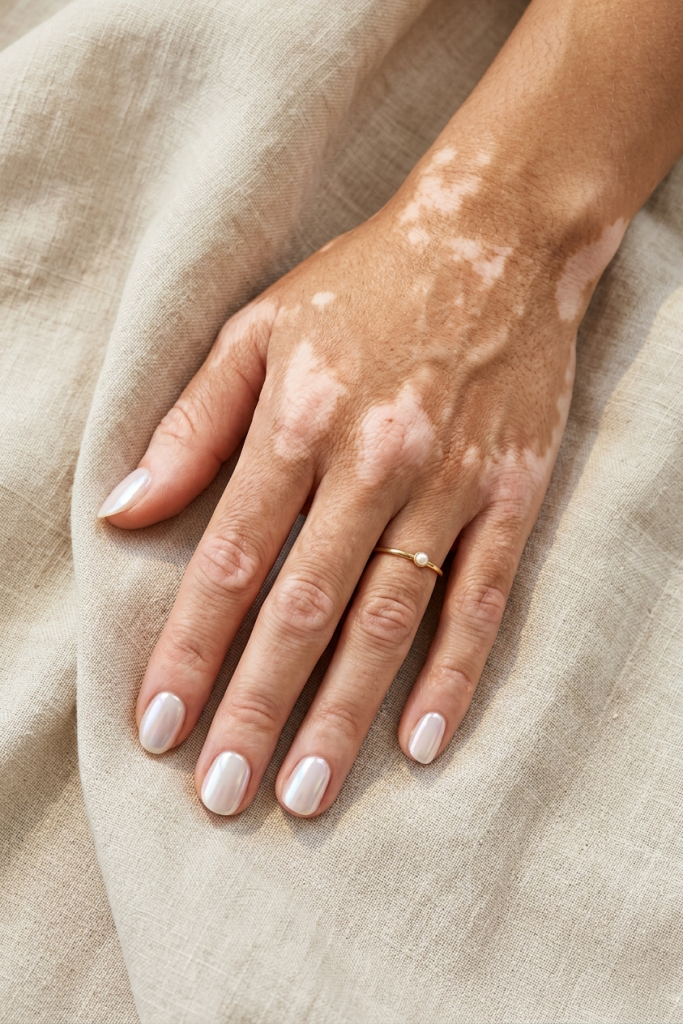
Why It’s Unique
Need a break from bright, chaotic summer graphics? Here’s an ultra-clean, minimalist pearl glaze look. It beautifully reinvents the naked nail trend by adding a sophisticated, silk-like iridescence over a soft ivory base. The frosty satin reflection catches the afternoon light effortlessly without looking overly flashy.
How to Do It
- Prep the Base: Shape your nails neatly and apply a clear protective bottom coat.
- Paint the Ivory: Apply two thin, even layers of a milky white gel polish.
- Apply Top Coat: Add a layer of no-wipe gel top coat and cure it.
- Buff the Pearl: Rub a translucent pearl chrome powder firmly across the nail surface.
- Dust it Off: Use a clean, fluffy brush to remove excess powder from cuticles.
- Seal the Satin: Finish with a high-gloss top coat to lock in the glow.
13. Vanilla Blossom French Nails
Why It’s Unique
Who says French manicures have to be incredibly predictable? This design completely elevates classic styling with a creamy vanilla bean shade. The warm pastel micro-tips offer an effortlessly chic alternative to loud summer neon trends. It gives off major European cafe vacation energy while keeping your hands looking perfectly polished.
How to Do It
- Prep the Base: Shape your nails neatly and apply a clear protective bottom coat.
- Paint the Nude: Coat your nails in a sheer, natural skin-tone base polish layer.
- Map the Tips: Use an ultra-fine detail brush to trace thin French tips.
- Fill with Vanilla: Paint the micro-tips using a creamy, pastel pale yellow shade.
- Clean the Lines: Crisp up any uneven edges using a small brush dipped in acetone.
- Seal the Look: Apply a high-gloss top coat to lock in the clean finish.
14. Pastel Rainbow Nails for Summer

Why It’s Unique
Can’t decide on just one color? Then try a few. This gorgeous palette solves your entire summer manicure existential crisis in five seconds flat. It takes the classic multi-colored rainbow look and tones it down into a dreamy, chalky cream finish. Each finger gets its own soft muted shade for a playful vibe that still looks incredibly cohesive and high-end.
How to Do It
- Prep the Nails: Shape your tips and apply a clear protective base coat layer.
- Paint the Thumb: Apply two smooth coats of a soft peach pastel shade.
- Color the Rest: Paint remaining nails with powder blue, butter yellow, lavender, and mint.
- Keep it Clean: Use a tiny brush with acetone to remove mistakes near cuticles.
- Seal the Rainbow: Finish with a thick, glossy top coat to lock everything in.
15. Strawberry Milk Chrome Nails (BFFs Goal)
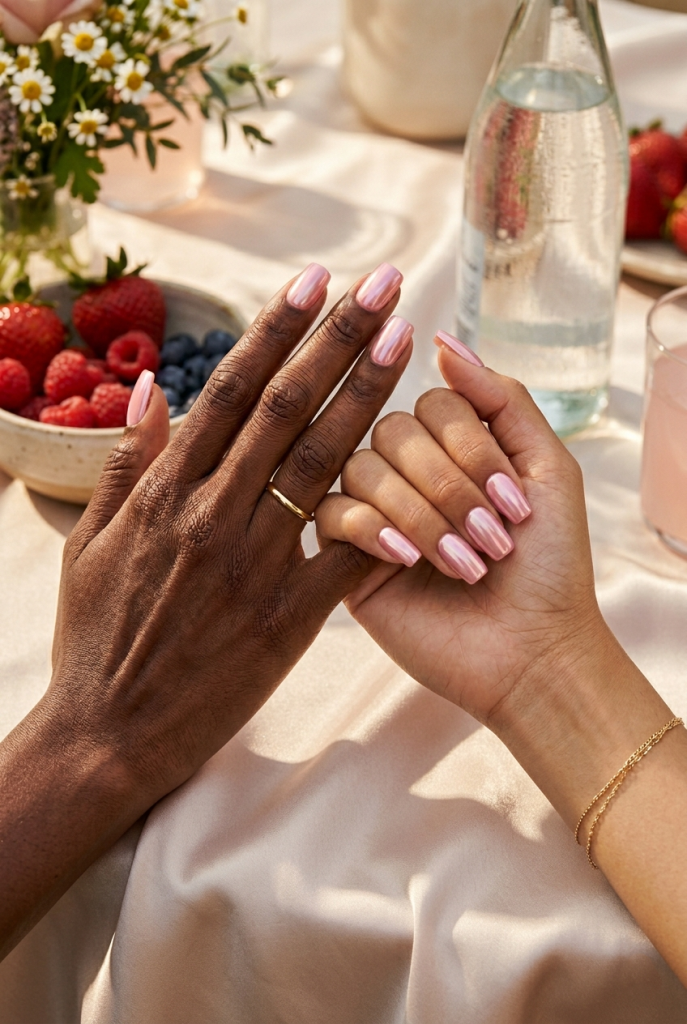
Why It’s Unique
Talk about ultimate summer duo goals. Bestie dates at the picnic table just got a serious style upgrade. I love how this look matches your nails to a sweet glass of strawberry milk while swapping out ordinary flat pinks for a futuristic, high-shine glaze. The metallic shift looks incredibly flattering on every skin tone under the afternoon sun.
How to Do It
- Prep the Base: Shape your nails neatly and apply a clear protective bottom coat.
- Paint the Pink: Apply two even layers of a milky, pastel strawberry pink polish.
- Add Gel Coat: Swipe a layer of no-wipe gel top coat and cure completely.
- Buff the Glaze: Rub a translucent pink chrome powder firmly onto each nail surface.
- Clean the Cuticles: Dust away any stray metallic powder with a clean, fluffy brush.
- Seal and Shine: Finish with a final glossy gel top coat to lock everything in.
Ready to start? Don’t forget to let me know which summer nail art you liked most.